

Manual Table Of Contents
- Design Philosophy
- Quick Start
- Location Details
- Settings
- Components
- Additional Information
- Advanced
Here’s the revised introduction:
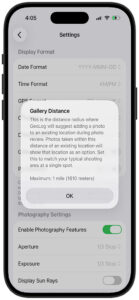
What is Gallery Distance?
Gallery Distance determines how GeoLog groups your photos into locations. When you take photos at roughly the same spot, GeoLog needs to decide: are these part of the same location, or are they different places that deserve separate entries?
The Problem It Solves
Gallery Distance was born from a real photography workflow problem. Imagine you’re shooting Rowes Wharf in Boston and capture some great compositions. A week later, a friend asks, “Why didn’t you include the Custom House Tower in the shot?”
You return to find an angle that shows both Rowes Wharf and the Custom House. You take the photos, but now you have a question: should these new photos join your existing Rowes Wharf location, or create a new separate location?
Return Visits and Camera Sessions:
During a single camera session, GeoLog automatically groups all your photos together as one location. But what happens when you:
- Close the camera and reopen it minutes later from a slightly different spot?
- Return a week later to capture the same lighthouse at sunrise instead of sunset?
- Come back during different seasons to get fall foliage or snow?
- Discover a better vantage point 50 meters from your original spot?
- Shoot additional detail photos—signs, plaques, architectural elements—that provide context?
Without Gallery Distance, each camera session would create a separate location entry, even if you were photographing the same subject from nearby positions. Your location list would be cluttered with duplicate entries for the same spot, making it difficult to see all your work for that subject in one place.
Gallery Distance ensures photos of the same subject stay together, building a comprehensive gallery that tells the complete story over time and across multiple visits.
How It Works
When you take photos with GeoLog’s camera or import photos from your Camera Roll:
- GeoLog looks at each photo’s GPS coordinates
- It compares the distance between photos
- Photos within your Gallery Distance setting are grouped together as one location
- Photos beyond that distance become separate locations
Example:
- You photograph a lighthouse from the parking area (photo 1)
- You walk 30 meters closer for a different composition (photo 2)
- Later that day, you close the camera and reopen it 40 meters away for another angle (photo 3)
- You return next week and shoot from 25 meters away (photo 4)
With a 75-meter Gallery Distance:
- All four photos → Same location (all within 75m of each other)
- One location entry with a 4-photo gallery showing your subject from different angles and times
If the keeper’s house is 150 meters away:
- Keeper’s house photos → Separate location (beyond 75m)
Why Distance Matters in Photography
In photography, 500m (over 1,600 ft) is a massive distance. In a city, that’s about 5-6 blocks; in nature, it could be the difference between being on a mountain peak versus at the trailhead.
Recommended Default: 75 Meters (250 Feet)
I suggest a default of 75 meters (250 feet). This is slightly shorter than a standard soccer field, and here is why it works for photographers:
This is slightly shorter than a standard soccer field, and here is why it works for photographers:
- The “Same Composition” Rule: Typically, if a photographer moves more than 75m, the relationship between their foreground and background changes so much that it is technically a “different shot” or a different “vantage point.”
- Urban Accuracy: In a city, 75m usually ensures you aren’t accidentally tagging a photo to a gallery for a building on the next block over.
- GPS Drift Buffer: Most modern smartphones have a GPS accuracy of about 5–10m. A 75m radius is large enough to absorb “GPS jump” so the app doesn’t think you’ve left the location, but small enough to remain relevant.
Proximity Tiers for GeoLog
If you want to offer “Presets” in your settings, here is how you might label them to make sense to a photographer:
| Setting Name | Radius (Meters) | Use Case / Logic |
|---|---|---|
| Tight | 25m | Architecture/Street: You are standing at the exact same doorway or monument. |
| Standard (Default) | 75m | “The Soccer Field”: You are in the same general area or park clearing. |
| Landscape | 150m | Vast Vistas: You are scouting a large ridge or a beach where “The Beach” is one gallery. |
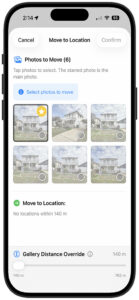
Gallery Distance Override
What It Does:
The Gallery Distance Override is a special tool that appears when moving photos between locations. It expands your search radius beyond your default Gallery Distance setting to find nearby locations at larger sites.
When You’ll See It:
- Only appears in the “Move Photos to Another Location” screen
- Shows up when nearby locations exist beyond your normal Gallery Distance but within 762 meters (2,500 feet)
- If all nearby locations are already within your default distance, the override slider is hidden
How to Use It:
- Tap “Move Photos to Another Location” (orange button)
- If the override slider appears at the bottom, it means additional locations exist in the extended range
- Drag the slider to expand search radius from your Gallery Distance up to 762m
- As you adjust, the “Move to Location” list updates to show newly found destinations
- Tap the ℹ️ info button for detailed guidance
Understanding Gallery Photos vs. Separate Locations:
Gallery photos tell the story of a single subject from different perspectives and distances. They provide supporting context and documentation for one main subject.
When to Use Gallery Distance Override:
Use the override to consolidate photos of the same subject taken from different positions:
- Multiple compositions of one lighthouse – closer shots, wider environmental shots, different angles
- Same building photographed from various distances – detail shots, full building, context with surroundings
- One tree or rock formation – tight crop, medium shot, environmental context showing location
- Supporting details for your main subject:
- Historical markers or plaques explaining the subject
- Informational signs about the site
- Environmental context showing how to find it
- Architectural details that tell the subject’s story
When NOT to Use the Override:
If you have different subjects, they should remain separate locations because you may want to plan them differently:
- Different buildings – Each building might have different lighting needs, golden hour angles, or seasonal considerations
- Different trees or natural features – Each may be best at different times of day or year
- Different mountains or peaks – Each viewpoint requires separate planning for composition and conditions
- Unrelated landmarks – Just because they’re nearby doesn’t mean they should be combined
Why Keep Subjects Separate:
Each subject deserves its own location because:
- Different optimal shooting times (sun angle, lighting, shadows)
- Different seasonal considerations (foliage, snow, crowds)
- Different composition requirements (foreground elements, vantage points)
- Different return visit planning (you may want to reshoot one but not the other)
- A gallery photo may never become its own main subject – once buried in another location’s gallery, that potential composition might be forgotten
The Right Mindset:
Ask yourself: “Are these photos of the same subject from different positions, or are they photos of different subjects that happen to be near each other?”
- Same subject, different positions → Use override to consolidate
- Different subjects → Keep as separate locations for better planning
Typical Override Scenarios:
✅ Same Subject – Consolidate:
- Lighthouse photographed from parking lot (200m), from beach (100m), and from rocks (50m away)
- Old barn shot wide (150m), medium (75m), and detail shots of weathered wood (at the barn)
- Mountain vista from overlook, then walked closer for foreground boulder composition
- Historic building’s facade, then moved around to capture side entrance and courtyard
❌ Different Subjects – Keep Separate:
- Lighthouse in one location, keeper’s house as separate location (different subjects, different planning needs)
- Two different barns on same property (each may have different optimal light)
- Multiple peaks visible from a trail (each requires different composition planning)
- Different sculptures in a sculpture garden (each is its own artistic subject)
Important Reminder:
Gallery photos support and document one main subject. They show context, details, and alternative compositions of that subject. If something deserves its own planning, its own return visit timing, its own composition strategy – it deserves to be its own location, not hidden in another location’s gallery.