
Manual Table Of Contents
- Design Philosophy
- Quick Start
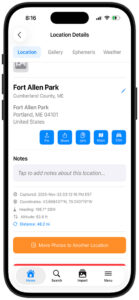
- Location Details
- Settings
- Components
- Additional Information
- Advanced
Moving Photos to Another Location
When multiple locations exist within close proximity to each other, GeoLog provides a way to consolidate photos by moving them between locations. This is useful when you’ve accidentally created duplicate locations, want to reorganize photos taken during the same visit, or need to merge closely-spaced viewpoints.
When the Move Button Appears
The orange “Move Photos to Another Location” button appears at the bottom of the Location Details screen (above the Delete button) when:
- One or more other locations exist within your Gallery Distance radius (Settings → Gallery Distance, default 70 meters/230 feet)
- The current location has at least one photo that can be moved
If no nearby locations exist, the button doesn’t appear—you can only move photos when there’s a destination location within range.
How to Move Photos
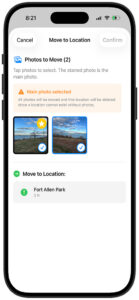
Step 1: Tap the Move Button
Tap the orange “Move Photos to Another Location” button at the bottom of the Location Details screen. The Move to Location sheet appears.
Step 2: Select Photos to Move
The top section shows “Photos to Move” with thumbnails of all photos at the current location.
- By default, no photos are selected
- Tap individual photos to select them (blue checkmark appears)
- Tap again to deselect
- The starred photo is the current main photo
Important Main Photo Rule: If you select the main photo (the one with the star), you must move all photos. You cannot leave any photos behind because a location cannot exist without a main photo.
Warning indicator: When the main photo is selected, an orange warning banner appears:
- “⚠ Main photo selected”
- “All photos will be moved and this location will be deleted since a location cannot exist without photos.”
This reminds you that moving the main photo means the current location will be completely deleted after the move. When this warning appears, all photos are automatically selected and you cannot deselect any of them.
Step 3: Choose Destination Location
The bottom section shows “Move to Location:” with a list of all locations within Gallery Distance, sorted by proximity.
Each destination location shows:
- Location name
- Distance from current location (e.g., “2 ft”)
- Green navigation arrow icon
Tap the location where you want to move the selected photos. A blue checkmark appears next to the selected destination.
Step 4: Confirm the Move
The “Confirm” button in the upper-right corner is disabled (grayed out) until you:
- Select at least one photo to move
- Select a destination location
Once both are selected, the Confirm button becomes active. Tap “Confirm” to complete the move.
What happens:
- Selected photos are moved to the destination location as gallery photos
- If the main photo was included, the source location is deleted
- If only gallery photos were moved, the source location remains with its main photo and any unselected gallery photos
- You’re returned to the location list or the destination location details
To cancel: Tap “Cancel” in the upper-left corner to exit without moving any photos.
Understanding the Results
Scenario 1: Moving Only Gallery Photos
You have a location with 5 photos (1 main + 4 gallery). You select and move 3 gallery photos, leaving the main photo and 1 gallery photo behind.
Result:
- Source location still exists with 2 photos (main + 1 gallery)
- Destination location gains 3 additional gallery photos
- Both locations remain in your library
Scenario 2: Moving All Photos (Including Main)
You have a location with 3 photos. You select the main photo—all 3 photos are automatically selected and must be moved together.
Result:
- Source location is completely deleted
- Destination location gains 3 additional gallery photos
- Only the destination location remains in your library
- The moved main photo becomes a gallery photo at the destination (it does not replace the destination’s main photo)
Common Use Cases
Accidental Duplicate Locations: You photographed a lighthouse, then walked 20 feet and photographed it again, creating two locations. Select all photos from the second location (including main) and move them to the first, consolidating everything in one place.
Organizing Multi-Visit Photos: You visited a location in summer, created a location. You return in fall and create a second location nearby. Select the fall photos and move them to the summer location so all visits are grouped together chronologically.
Correcting Import Mistakes: You imported 10 photos at once, and each became a separate location (Import creates one location per photo). Select and move 9 of them to the first location, consolidating all photos under one location.
Merging Close Viewpoints: You created separate locations for “Lighthouse – East View” and “Lighthouse – South View” only 50 feet apart. After reviewing, you decide they’re similar enough to consolidate. Select all photos from one and move to the other.
Cleaning Up Test Locations: You were experimenting with the camera and created a test location near your home. You already have a proper home location. Select any useful test photos and move them to your main home location, then delete the test location.
Moving Only Context Photos: You have a location with a good main photo but several gallery photos of signs or context shots that actually belong to a different nearby location. Select only those gallery photos (not the main photo) and move them to the appropriate destination.
Moving to Multiple Destinations
The Move feature works on one destination at a time. If you want to distribute photos from one location to several different locations:
- Select some photos and move to the first destination
- The Move button remains (if nearby locations still exist and photos remain)
- Select different photos and move to the second destination
- Repeat as needed
Example: You have one location with 6 photos—2 of a lighthouse, 2 of a nearby beach, 2 of a parking area. You have three separate locations for each subject within Gallery Distance.
- Select the 2 lighthouse photos, move to “Lighthouse” location
- Select the 2 beach photos, move to “Beach” location
- Select the main photo + remaining parking photo (all photos now selected), move to “Parking” location
- Source location is now deleted (all photos moved)
Gallery Distance and Move Availability
The Move feature only shows locations within your current Gallery Distance setting:
Gallery Distance: 70 meters (default)
- Locations within 230 feet appear as move destinations
- Good for most photography scenarios
Gallery Distance: 30 meters (smaller radius)
- Fewer locations appear as destinations
- Useful when you want very precise location separation
- May not show locations you expect if they’re slightly outside the radius
Gallery Distance: 200 meters (larger radius)
- Many more locations appear as destinations
- Useful for consolidating locations across a large park or urban area
- May show locations that are actually quite far apart
Adjusting Gallery Distance: If you don’t see the expected destination location in the move list, check Settings → Gallery Distance and consider temporarily increasing it. The move list updates immediately when you change this setting.
Pro Tips
Edit location titles first: Before moving photos between locations with similar names (e.g., three locations all named “Fort Allen Park”), edit the titles to be distinct (e.g., “Fort Allen Park – Sunset Spot”, “Fort Allen Park – Beach Access”, “Fort Allen Park – Parking Overlook”). This makes it much easier to select the correct destination when moving photos.
Review photos before moving: Tap through the Gallery tab of both the source and destination locations before moving. Make sure you’re consolidating the right photos and that the destinations make sense.
Check main photo selection carefully: The orange warning banner is your friend. If you see it and weren’t planning to delete the source location, deselect the main photo and choose only the gallery photos you want to move.
Consider keeping separate locations for different compositions: Just because two locations are close doesn’t mean they should be merged. If they represent genuinely different viewpoints or compositions (different headings, different subjects), keep them separate even if they’re within Gallery Distance.
Use move instead of delete-and-reimport: If you want to reorganize photos, moving them preserves all metadata, notes, and organization. It’s much faster than deleting locations and re-importing photos.
Destination main photo doesn’t change: When you move photos (even if one was the main photo at the source), they all become gallery photos at the destination. If you want one of the moved photos to become the new main photo, go to the destination location’s Gallery tab and tap its star icon after the move is complete.
Distance shown is helpful: The distance indicator next to each destination (e.g., “2 ft”) helps you choose the most appropriate location. The closest one is usually the right choice, but not always—use your judgment based on what each location represents.
Moving photos doesn’t change GPS coordinates: The destination location’s anchored GPS coordinates remain unchanged. The moved photos retain their original GPS data in metadata, but they now belong to the destination location’s anchor point for organizational purposes.
Start with gallery photos: If you’re uncertain about moving the main photo, start by selecting only gallery photos. This lets you consolidate some images while keeping the source location intact. You can always come back and move the main photo later if you decide to fully merge the locations.
What You Cannot Do
Cannot move photos to distant locations: The move feature only works with locations inside Gallery Distance. If you want to move photos to a location that’s miles away, you’ll need to delete them from the source and manually add them to the destination (or adjust Gallery Distance temporarily to an extreme value, though this isn’t recommended).
Cannot merge locations without moving photos: There’s no “merge two locations” feature. You can only move photos from one location to another. If you want to truly merge two locations, move all photos from one to the other, which deletes the source.
Cannot undo a move: Once you tap Confirm, the move is permanent. If you moved photos to the wrong location, you’ll need to navigate to that location and move them again to the correct destination.
Cannot change destination’s main photo during move: Moved photos always become gallery photos at the destination. You must manually change the main photo afterwards if desired.
Cannot partially move when main photo is selected: If you select the main photo, all photos are automatically selected and must be moved together. You cannot deselect individual gallery photos once the main photo is selected—it’s all or nothing.
The Move Photos feature helps you keep your location library organized by consolidating photos from nearby locations. Whether you’re cleaning up duplicates, organizing multi-visit photos, or correcting import mistakes, this tool makes it easy to reorganize without losing any photo data or metadata.