
Manual Table Of Contents
- Design Philosophy
- Quick Start
- Location Details
- Settings
- Components
- Additional Information
- Advanced
GeoLog makes it easy to import existing photos from your iPhone’s camera roll. The app automatically groups photos by location, making organization effortless.
Accessing Photo Import
From Main Menu:
- Tap Import tab at the bottom of the screen
- Or tap Import from bottom menu
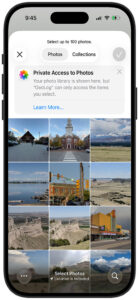
- Select photos you want to import
- Tap “Import” (shows count, e.g., “Import (30)”)
How Photo Import Works
1. Select Photos
- Browse your photo library
- Tap multiple photos to select
- Selected photos show a checkmark
- Counter shows total selected
2. Automatic Grouping
GeoLog analyzes your selected photos and intelligently groups them by shooting location. Photos taken at the same place are grouped together automatically.
What Gets Analyzed:
- GPS coordinates from each photo
- Capture timestamp
- Preview thumbnail
Photos Without GPS:
Photos missing location data appear in a separate “No Location Data” section and are skipped during import. Only photos with GPS coordinates can be imported.
Note: You can import photos that do not have GPS data as gallery photos. Select the location, gallery and (+)
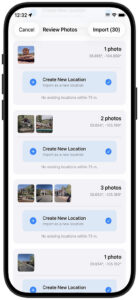
3. Review Groups
The Review Photos screen shows your photos organized into location-based groups. Each group displays:
- Photo count – “1 photo”, “2 photos”, “3 photos”, etc.
- Coordinates – Location coordinates for the group
- Thumbnails – Preview of up to 3 photos
- Import action – Blue button showing how these photos will be imported
- Distance note – “No existing locations within 75 m” (or similar)
Review Photos screen – Photos automatically grouped by location
Import Actions
For each group of photos, GeoLog suggests the best import method:
Create New Location ✓
- Creates a fresh location pin on the map
- Best when photos are from a new place
- The oldest photo in the group becomes the featured image
- Shown with blue plus icon and checkmark
Add to Existing Location
- Adds photos to a location you’ve already created
- GeoLog automatically detects nearby existing locations
- The closest existing location is pre-selected
- Perfect for return visits to the same spot
- If available, appears as additional button options
How GeoLog Chooses:
- If existing locations are nearby (within your Gallery Distance setting), you’ll see “Add to Existing” options
- If no locations are nearby, “Create New Location” is selected by default
- You can change the action for any group before importing
- Blue checkmark shows selected action
Note: If multiple photos are grouped into the same location and you feel they should be in their own location, you can take any gallery photo and promote it to its own location. Select the location, gallery, tap the photo to view full size and choose the hamburger in the upper right (☰), then select “Create New Location”
Grouping Distance
Photos are grouped based on your Gallery Distance setting:
- Photos within this distance are grouped together
- Default: 75 meters
- Adjust in More → Settings → Gallery Distance
- Based on your shooting style:
- Smaller distance (25-50m) – Separate groups for nearby spots
- Larger distance (100-200m) – Combine photos from wider area
Import Workflow
Step-by-step:
- Tap Import tab (or More → Import from Camera Roll)
- Select your photos – Tap multiple photos
- Tap “Import (30)” – Button shows count
- Review Groups – Screen shows organized groups
- Check import actions – Verify each group’s blue action button
- Adjust if needed – Tap action button to change for any group
- Tap final “Import” – Photos are added to GeoLog
What Happens:
- New locations created on map (with pins)
- Photos added to location galleries
- Oldest photo in each group becomes the featured image
- GPS metadata preserved
- Original photos remain in Camera Roll (not moved or deleted)
Understanding the Review Screen
At the Top:
- Cancel (left) – Return to photo selection
- Review Photos (center) – Current screen title
- Import (30) (right) – Final import button with count
Each Group Shows:
- Photo thumbnails (up to 3 visible)
- Photo count and coordinates
- Blue “Create New Location” button with checkmark (if selected)
- Gray note about nearby locations
- Additional action buttons if existing locations nearby
Scrolling:
- Scroll to see all groups
- Each group is a separate card
- Review all before importing
Tips for Importing
Before Import:
- Check Gallery Distance setting matches your needs
- Ensure photos have GPS data (check in Photos app)
- Consider organizing photos in Albums first
- Select manageable batch size (30-50 photos recommended)
During Review:
- Scroll through all groups before importing
- Check thumbnails to verify correct grouping
- Tap coordinates to understand location
- Look for “No existing locations” messages
- Adjust actions if groups should merge differently
After Import:
- Tap Home to see new locations
- Or tap More → Map to view on map
- Review location galleries
- Add notes and tags to locations
- Rename locations if needed
Common Scenarios
Vacation Photos:
- Select all photos from trip
- GeoLog groups by hotel, restaurants, attractions
- Each major location gets its own pin
- Quick organization of entire trip
- Example: 30 photos → 5 groups (different locations visited)
Event Coverage:
- Import photos from wedding, concert, etc.
- Nearby shots grouped together
- Venue becomes one location
- Different areas of venue may create separate groups
- Example: 15 photos → 2 groups (ceremony + reception)
Return Visits:
- Import photos from place you’ve been before
- GeoLog detects existing location
- Automatically suggests “Add to Existing”
- Builds photo gallery over multiple visits
- No duplicate location pins created
Mixed Locations:
- Import photos from multiple days/places
- GeoLog separates by location automatically
- Each distinct place gets its own group
- Review ensures correct organization
- Example: Road trip → groups for each stop
Troubleshooting Import
“No Location Data” Section:
- Some photos missing GPS
- Taken with location services off
- Screenshots or edited photos
- These photos cannot be imported to GeoLog
- They appear in separate section at bottom
Too Many Groups:
- Gallery Distance may be too small
- Increase in More → Settings → Gallery Distance
- Cancel import and adjust setting
- Re-select photos to see different grouping
Groups Too Large:
- Gallery Distance may be too large
- Photos from different spots combined
- Decrease Gallery Distance setting
- Cancel and re-import with adjusted setting
Wrong Import Action:
- GeoLog’s suggestion can be changed
- Tap blue action button to see all options
- Choose “Create New Location” or select different existing location
- Blue checkmark shows active selection
- Make changes before tapping final Import button
Can’t Find Import:
- Look for Import tab at bottom
- Or tap More tab → scroll to find Import option
- Ensure you’re not in a different feature
- Return to main menu if needed
Best Practices
Selective Import:
- Don’t import everything at once
- Import by trip, event, or date range
- Easier to review smaller batches (30-50 photos)
- More control over organization
- Can always import more later
Check GPS First:
- In Photos app, swipe up on image
- Look for map showing location
- No map = no GPS data
- Save time by filtering before import
- Use Albums to pre-organize GPS photos
Use Gallery Distance:
- Adjust before importing
- Test with small batch first (5-10 photos)
- Find setting that matches your workflow
- Can cancel and re-adjust if needed
- Remember: affects existing locations too
Review Before Import:
- Scroll through all groups
- Verify thumbnails look correct
- Check coordinates make sense
- Read “No existing locations” messages
- Adjust actions as needed
- Don’t rush the final Import tap
Navigation After Import
Viewing Your Imports:
- Home tab – Shows locations in list/grid
- More → Map – Shows location pins on map
- Anchor tab – Bookmarked locations
- More → Camera – Add more photos to locations
Managing Imported Locations:
- Tap location to view details
- See photo gallery
- Add notes and tags
- Rename location
- Pin for quick access
- Access via More → Map