
Manual Table Of Contents
- Design Philosophy
- Quick Start
- Location Details
- Settings
- Components
- Additional Information
- Advanced
Welcome to GeoLog! Getting started is simple—the app is designed to create locations quickly with minimal typing by leveraging the GPS data already embedded in your photos.
Your First Location
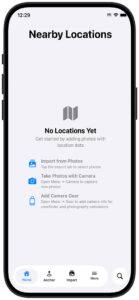
When you first launch GeoLog, you’ll see three options for getting started. Choose the method that works best for you:
Option 1: Import from Photos
The fastest way to populate GeoLog with your existing photography locations.
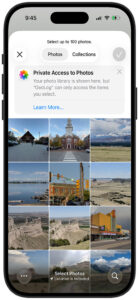
- Tap the Import tab at the bottom of the screen
- Select photos from your library (up to 100 at a time)
- GeoLog intelligently groups photos by location (see: Importing Photos from Camera Roll)
Important: GeoLog only imports photos that contain GPS data. Photos without location information will be filtered out automatically.
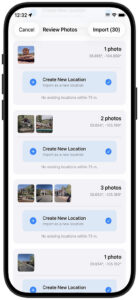
How Import Works:
- GeoLog uses Intelligent Grouping to automatically organize your photos by location
- Photos taken at the same place are grouped together (based on your Gallery Distance setting)
- Each group becomes one location on your map – no duplicate pins for nearby shots
- The oldest photo in each group becomes the featured image
- Before importing, you can review all groups and choose to:
- Create New Location – for new places
- Add to Existing Location – if you’ve been there before
- GeoLog automatically reverse geocodes each location to determine the title (e.g., “Yosemite Valley, CA” or “Golden Gate Overlook”)
- You can always edit titles, add notes, and organize photos after importing, including promoting gallery photos to new locations.
Option 2: Take Photos with Camera
Perfect for creating locations while you’re out in the field.
- Open the Menu (tap the menu icon at bottom right)
- Navigate to Camera
- Start capturing photos at your location
- When finished, tap Done
How Camera Works:
- All photos taken in the same camera session are grouped together as one location
- The first photo you take becomes the default main photo
- Before creating the location, you can tap the star icon on any photo to change which one is the main photo
- When you finish the session, GeoLog checks for nearby existing locations
- You’ll be given the option to either:
- Add photos to an existing nearby location (as gallery photos)
- Create a new location with these photos
This intelligent grouping prevents duplicate locations when you’re shooting multiple frames at the same spot.
Option 3: Add Camera Gear
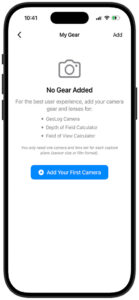
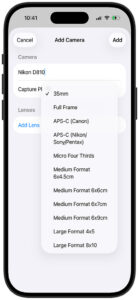
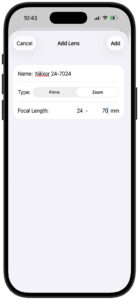
Before using the camera viewfinder with crop marks or the photography calculators, you’ll want to add your camera gear.
- Open the Menu (tap the menu icon at bottom right)
- Navigate to Gear
- Add your camera bodies and lenses
Once your gear is configured, you can:
- Use crop marks in the camera viewfinder to visualize how your main camera will frame the scene
- Get accurate calculations for depth of field and field of view
- Calculate proper exposures with filters and film reciprocity
Understanding Location Titles
GeoLog uses reverse geocoding to automatically generate location titles from GPS coordinates. This means you can create locations quickly without typing—just import or photograph, and the app handles the naming.
The generated titles typically include:
- Landmark or feature names when available
- City or region
- State or country
Example titles:
- “Half Dome Trail, Yosemite Valley, CA”
- “Brooklyn Bridge Park, Brooklyn, NY”
- “Maroon Bells, Aspen, CO”
- “Via dei Fori Imperiali, Rome, Italy”
- “Piazza del Colosseo, Rome, Italy”
Important Note About Location Accuracy:
The generated address reflects your camera position when the photo was taken—not necessarily the subject you photographed. This is actually a feature, not a limitation. As a photographer, you need to return to the exact spot where you stood to recreate or improve upon the shot in different lighting and weather conditions.
For example:
- A photo of the Colosseum might be titled “Via Nicola Salvi, Rome, Italy” because that’s the street where you stood for the best angle
- A landscape shot might show “Tunnel View Parking Area” rather than “El Capitan” because that’s where you need to return with your tripod
You can always edit these titles to be more descriptive (e.g., “Colosseum from Via Salvi – Sunset View” or “El Capitan from Tunnel View”) while preserving the GPS coordinates that will guide you back to the exact shooting position.
What’s Next?
Once you’ve created your first few locations, you can:
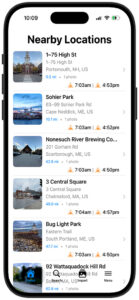
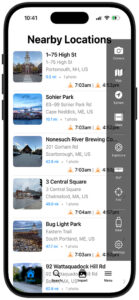
- Browse locations on the map or in list view
- Add notes about lighting, composition ideas, or return plans
- Rate locations to mark your favorites
- Search and filter to find specific spots quickly
- Plan return trips using the calculators and ephemeris tools
GeoLog is designed to get out of your way and let you focus on photography. The more you use it, the more valuable your location library becomes.