
Manual Table Of Contents
- Design Philosophy
- Quick Start
- Location Details
- Settings
- Components
- Additional Information
- Advanced
GeoLog includes professional photography calculators to help you nail exposure in challenging lighting conditions and understand your camera’s optical characteristics.
Calculators Table of Contents
Accessing the Calculators
iPhone Only: The photography calculators are currently available only on iPhone, not iPad.
To access the calculators:
- Tap the Menu button in the main interface
- The Side Menu will slide in from the right
- Select your desired calculator:
- Exposure – Exposure compensation with film reciprocity and timer
- DoF – Depth of Field calculator
- FoV – Field of View calculator
Note: Photography calculators only appear in the menu if Photography Features are enabled in Settings.
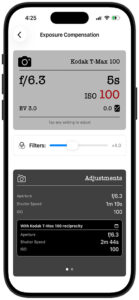
Exposure Compensation Calculator

The Exposure Compensation calculator helps you adjust exposure settings and accounts for film reciprocity failure during long exposures.
Basic Operation
Camera Settings
The calculator displays your current camera settings in a film camera style interface:
- Film/Sensor: Shows selected film stock or “Digital”
- Tap to select from available film stocks with reciprocity data
- Aperture (f-stop): Current aperture setting
- Tap to open picker with your preferred stop increments
- Use slider for quick adjustments
- Shutter Speed: Current exposure time
- Tap to open dual-mode picker
- Short Exposure: < 1 second (displays as fractions like 1/60)
- Long Exposure: ≥ 1 second (displays as hours, minutes, seconds)
- ISO: Current sensitivity setting
- Tap to open picker with your preferred stop increments
- EV Compensation: Exposure value adjustment
- Tap to adjust in ±10 EV range
Filters
Add neutral density or other filters that reduce light:
- No Filters: Use the slider to quickly add 0-11 stops of compensation
- With Filters: Tap “Filters” to add specific filters from the library
- Choose filter type (ND, GND, Polarizer, etc.)
- Select specific strength or variant
- Multiple filters combine automatically
- Quick slider is disabled when actual filters are attached
Exposure Results
The calculator displays two exposure scenarios:
Without Film Reciprocity
Shows the calculated exposure based purely on the exposure triangle (aperture, shutter, ISO) and any filters.
With Film Reciprocity
When film is selected, shows the corrected exposure accounting for reciprocity failure:
- Reciprocity Info Button (🔢): Tap the calculator icon to view detailed information:
- Film name and ISO rating
- Algorithm used (Power Law, Lookup Table, or Stop Correction)
- Model details and parameters
- Current calculation breakdown showing metered vs. corrected time
- Color filter suggestions (for color films)
- Warnings if exposure is beyond documented range
- Educational context about reciprocity failure
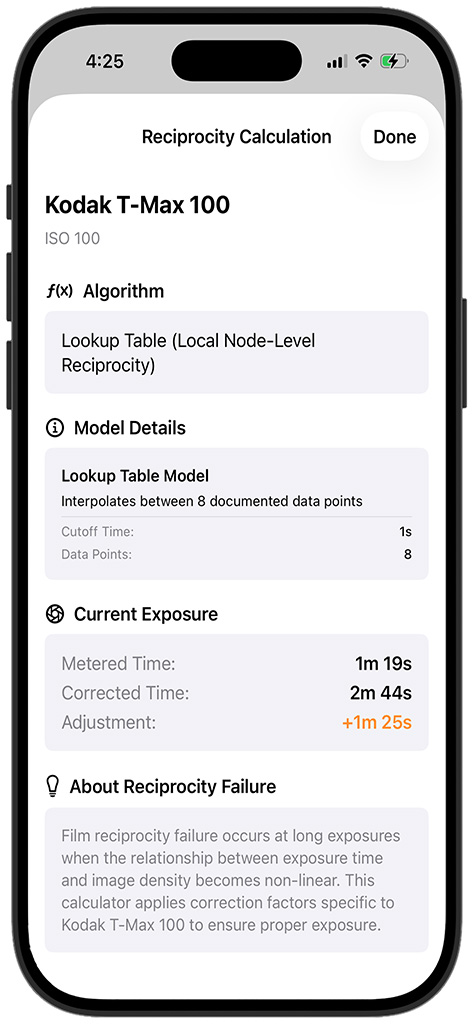
This transparency helps you understand and trust the calculations, especially for very long exposures.
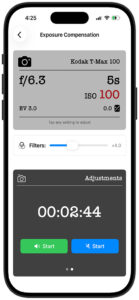
Exposure Timer
On the adjustments section, swipe to the left to reveal the exposure panel, with Start Timer buttons. The timer helps you execute long exposures with precision.
Starting the Timer
- Review your corrected exposure time
- Set up your camera on a tripod
- Configure camera for bulb mode or cable release
- Simultaneously press your camera shutter and Start Timer to begin countdown
Timer Features
Audio Modes:
- Silent Mode: (Blue Start Button) Visual-only countdown (respects iPhone silent switch)
- Audible Mode: (Green Start Button) Plays alert sounds at key moments
- Ten-minute warning for very long exposures
- Two-minute warning (like football’s two-minute warning)
- Closing beep sequence when time expires
Visual Feedback:
- Large countdown display showing remaining time
- Progress indicator
- Pause/Resume controls
- Cancel option
Dynamic Island Integration (iPhone 14 Pro and later)
When the timer is running, it automatically appears in the Dynamic Island:
- Compact View: Shows timer icon and remaining time
- Expanded View: Tap to see full countdown and controls
- Always Visible: Timer persists even when you:
- Switch to other apps
- Lock your phone
- Navigate away in GeoLog
From Lock Screen:
- Timer countdown shows on the lock screen with Live Activity
- Tap the Live Activity to instantly return to the Exposure Timer
- No need to unlock or navigate through the app
- Perfect for checking time remaining during long exposures
This integration means you can:
- Start your exposure timer
- Lock your iPhone to save battery
- Check progress by glancing at your lock screen
- Tap the lock screen notification to jump directly to the timer
- Complete your exposure without missing the critical moment
Timer Warnings
The timer provides strategic warnings to help manage long exposures:
Ten-Minute Warning (⏱️):
- For exposures longer than 10 minutes
- Helps you stay aware during very long exposures
- Good checkpoint for environmental changes (clouds, wind, etc.)
Two-Minute Warning (⏰):
- Alerts you when 2 minutes remain
- Time to prepare for exposure completion
- Check if any final adjustments needed
- Inspired by football’s two-minute warning system
Completion Alert (🔔):
- Distinctive sound pattern when timer reaches zero
- Closing beep sequence
- Notification persists until acknowledged
Best Practices
For Film Photography:
- Always select your specific film stock for accurate reciprocity correction
- Review the reciprocity detail sheet to understand the algorithm
- Note color filter suggestions for color film
- Be cautious with exposures beyond documented range
For Long Exposures:
- Use a sturdy tripod and cable release
- Enable mirror lock-up if available
- Cover the viewfinder to prevent light leaks
- Start the timer before opening the shutter
- Keep your phone nearby to monitor via Dynamic Island
- On very long exposures (>10 min), check for environmental changes at the 10-minute warning
Timer Tips:
- Lock your phone after starting the timer to save battery
- Tap the Lock Screen Live Activity to quickly return to the timer
- Use Silent Mode for discreet shooting in quiet environments
- Enable Audible Mode when you need to be alerted (e.g., shooting at night)
- The two-minute warning gives you time to prepare for shutter closure
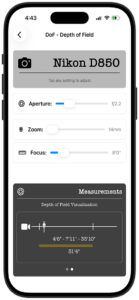
Depth of Field Calculator
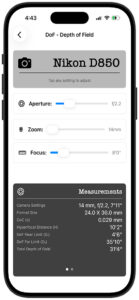
The Depth of Field (DoF) calculator shows you exactly what will be in sharp focus at any given camera setting and focus distance.
Setup
Camera Selection
- Camera: Tap to select from your saved cameras
- Uses sensor size from your gear database
- Defaults to Full Frame (36×24mm) if no camera selected
Lens Selection
- Lens: Tap to select from your saved lenses
- Prime Lenses: Fixed focal length
- Zoom Lenses: Use slider to adjust focal length throughout the zoom range
- Shows current focal length (e.g., “50mm” or “24-70mm @ 35mm”)
Camera Settings
Aperture:
- Tap to open the aperture picker
- Shows your preferred stop increments (full, half, or third stops)
- Use the slider on the button for quick adjustments
- Displays as f-number (e.g., f/5.6, f/11)
Focus Distance:
- Tap to open the focus distance picker
- Imperial Mode: Separate feet and inches pickers
- Metric Mode: Meters with decimal precision
- Infinity Toggle: ∞ button for hyperfocal and landscape work
- Minimum distance based on your settings (0-50 ft / 0-15.24 m)
Results Display
The calculator shows comprehensive depth of field information:
Depth of Field Distances
Near Limit: Closest point in acceptable focus
- Distance from camera sensor
- Everything from this point forward (toward camera) is out of focus
Focus Distance: Your actual focus point
- Where you focused the lens
- Point of maximum sharpness
Far Limit: Farthest point in acceptable focus
- Distance from camera sensor
- Everything beyond this point is out of focus
- Shows “∞” (infinity) if far limit extends infinitely
Total DoF: Overall depth of field
- Distance between near and far limits
- How much depth you have in focus
- Shows “Infinite” if far limit is at infinity
Focus Distribution
Behind Subject: Percentage of DoF beyond focus point
In Front of Subject: Percentage of DoF before focus point
Rule of thumb: Depth of field typically extends about twice as far behind the focus point as in front of it.
Hyperfocal Distance
The hyperfocal distance is where you should focus to maximize depth of field from half that distance to infinity.
Uses:
- Landscape photography
- Street photography
- Any situation where you want maximum DoF
- Focus at hyperfocal distance to keep everything sharp from foreground to horizon
Example: If hyperfocal distance is 20 feet:
- Focus at 20 feet
- Everything from 10 feet to infinity will be acceptably sharp
Understanding Depth of Field
Depth of field is controlled by three factors:
Aperture (f-stop):
- Smaller apertures (larger f-numbers like f/16) = More depth of field
- Larger apertures (smaller f-numbers like f/2.8) = Less depth of field
Focal Length:
- Longer focal lengths (telephoto) = Less depth of field
- Shorter focal lengths (wide angle) = More depth of field
Focus Distance:
- Closer focus = Less depth of field
- Farther focus = More depth of field
Sensor Size (via camera selection):
- Larger sensors = Less depth of field at equivalent framing
- Smaller sensors = More depth of field at equivalent framing
Practical Applications
Portraits:
- Use larger apertures (f/2.8, f/4) for shallow DoF
- Isolate subject from background
- Focus on the eyes
Landscapes:
- Use smaller apertures (f/11, f/16) for extensive DoF
- Focus at or near hyperfocal distance
- Keep foreground and background sharp
Street Photography:
- Focus at hyperfocal distance
- Use moderate aperture (f/8)
- Capture spontaneous moments without refocusing
Macro/Close-up:
- Be aware of extremely shallow DoF when focusing close
- Even at f/16, DoF may only be millimeters
- Consider focus stacking for maximum sharpness
Tips
- Circle of Confusion: GeoLog calculates CoC as sensor diagonal / 1500 (a widely accepted standard)
- Diffraction Limit: Very small apertures (f/22, f/32) may reduce sharpness due to diffraction
- Test Your Setup: Take test shots to verify acceptable sharpness for your standards
- Print Size Matters: Larger prints may show what’s acceptably sharp on screen as soft
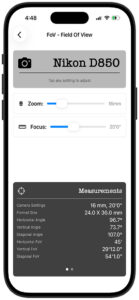
Field of View Calculator
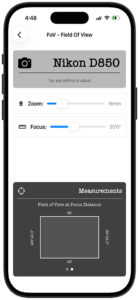
The Field of View (FoV) calculator helps you determine exactly what will be captured at any focal length and distance.
Setup
Camera Selection
- Camera: Tap to select from your saved cameras
- Uses sensor dimensions from your gear database
- Defaults to Full Frame (36×24mm) if no camera selected
- Sensor size critically affects field of view
Lens Selection
- Lens: Tap to select from your saved lenses
- Prime Lenses: Fixed focal length shown
- Zoom Lenses: Use slider to adjust focal length
- Shows current focal length (e.g., “85mm” or “70-200mm @ 135mm”)
Distance Settings
Subject Distance:
- Distance from camera to your subject
- Tap to open distance picker with feet/inches (Imperial) or meters (Metric)
- Use infinity toggle for landscape/architecture
Results Display
The calculator provides comprehensive field of view measurements:
Angular Field of View
Horizontal FoV: Width of the scene in degrees
Vertical FoV: Height of the scene in degrees
Diagonal FoV: Corner-to-corner coverage in degrees
These angular measurements are independent of distance and describe the lens’s angle of coverage.
Physical Field of View (at subject distance)
Width: How wide your frame is at the subject distance
Height: How tall your frame is at the subject distance
Example: At 10 feet with a 50mm lens on full frame:
- You’ll capture approximately 4.5 ft × 3 ft of the scene
Aspect Ratio
Shows the frame’s width-to-height ratio:
- Full Frame: 3:2 (1.5:1)
- APS-C typically: 3:2 (1.5:1)
- Micro Four Thirds: 4:3 (1.33:1)
Understanding Field of View
Field of view changes based on:
Focal Length:
- Shorter focal lengths (wide angle) = Wider field of view
- Longer focal lengths (telephoto) = Narrower field of view
- Doubling focal length approximately halves the field of view
Sensor Size:
- Larger sensors = Wider field of view at the same focal length
- Smaller sensors = Narrower field of view (crop factor effect)
- A 50mm lens on APS-C looks like a 75mm on full frame
Distance:
- Physical field of view (width/height) increases linearly with distance
- Angular field of view stays constant regardless of distance
- Moving twice as far = twice the coverage width and height
Practical Applications
Event Photography:
- Determine if you have enough room to capture a group
- Choose the right lens for the venue size
- Example: Can you fit 10 people in the frame at 15 feet?
Real Estate/Architecture:
- Calculate minimum distance needed to capture a building’s full width
- Select appropriate wide-angle lens for interior shots
- Determine if you can fit an entire room from the doorway
Product Photography:
- Determine working distance for desired framing
- Calculate how close you can focus while filling the frame
- Plan studio space requirements
Landscape Photography:
- Understand how different focal lengths compress or expand scenes
- Choose focal length to include or exclude foreground elements
- Plan compositions by knowing exactly what will be captured
Wildlife Photography:
- Calculate how close you need to be for desired subject size
- Determine if your longest lens provides adequate reach
- Example: How big will a 6-foot tall animal appear at 50 yards?
Tips
Crop Factor:
- If you know a lens’s FoV on full frame, multiply focal length by crop factor for equivalent view on smaller sensors
- APS-C crop factor ≈ 1.5× (Nikon, Sony) or 1.6× (Canon)
- Micro Four Thirds crop factor = 2.0×
Lens Selection:
- Ultra-wide (14-24mm): Architecture, interiors, landscapes
- Wide (24-35mm): Environmental portraits, photojournalism, landscapes
- Normal (40-60mm): Street photography, documentary, general use
- Short telephoto (70-105mm): Portraits, isolating subjects
- Telephoto (135-300mm): Wildlife, sports, distant subjects
- Super-telephoto (400mm+): Wildlife, birds, sports
Distance Considerations:
- Physical FoV measurements are most useful for planning compositions
- Angular FoV measurements help compare lenses
- Remember that perspective (not FoV) changes with distance
Sensor Size Impact:
- Always consider your specific camera’s sensor when planning shots
- Same lens on different sensor sizes = dramatically different coverage
- Use actual sensor dimensions in your camera profile for accurate calculations
General Tips
Managing Your Gear
All three calculators integrate with your Gear database:
- Add cameras with accurate sensor dimensions
- Add lenses with focal length specifications
- Once added, quickly select from your actual equipment
- Calculations use your real gear specifications
Settings Integration
Calculators respect your preferences from Settings:
- Stop Increments: Choose full, half, or third stops for aperture, shutter, and ISO
- Units: Switch between Imperial (feet/inches) and Metric (meters)
- Photography Features: Enable/disable calculator visibility in menu
Workflow Tips
Learning Mode:
- Use calculators to understand how settings interact
- Experiment with different combinations
- Note the relationships between aperture, shutter, and ISO
Planning Mode:
- Calculate settings before arriving on location
- Determine gear requirements for specific shots
- Plan exposure times for astrophotography or light trails
On-Location Mode:
- Quick reference while shooting
- Verify exposure compensation for tricky lighting
- Check depth of field for critical focus situations
Review Mode:
- Reverse-engineer successful shots
- Understand why certain settings worked
- Build mental models for future shoots
Support
For additional help or to report issues:
- Visit: AlwaysPhotographing.com
- Email: support@alwaysphotographing.com
This manual covers GeoLog photography calculators. For information about the main location features, please refer to the GeoLog User Manual.