
Manual Table Of Contents
- Design Philosophy
- Quick Start
- Location Details
- Settings
- Components
- Additional Information
- Advanced
GeoLog now supports iCloud syncing for your Locations, Photos, MyGear, and Settings. When enabled, all your data stays up to date across every iPhone and iPad signed in with the same Apple ID. Add, edit, or delete a location or gallery photo on one device, and the changes appear automatically on your others.
What Syncs
- Location data
- Photo metadata and thumbnails
- MyGear entries
- App settings
Recommended Device Roles
GeoLog is designed with a clear workflow in mind:
- iPhone — Primary Device
Your in‑field tool for capturing locations, taking photos, and updating data.
- iPad — Secondary Device
Ideal for planning, reviewing, and organizing locations on a larger screen.
Features Not Available on iPad
The iPad version (GeoPad) does not include:
- Camera
- Standalone Ephemeris
- Slate
- Exposure Calculator
- Depth of Field Calculator
- Field of View Calculator
The iPad experience is optimized for location planning, reviewing your work, and preparing for return trips. You can copy GPS coordinates from the Location Detail view (blue GPS button) and paste them into apps like TPS, PhotoPills, Google Maps, or Google Earth.
How to Set Up iCloud Sync
The steps below assume you already use GeoLog on your iPhone and want to begin using it on your iPad.
Step 1 — Create a Backup (iPhone)
Your iPhone should always be your primary backup device.
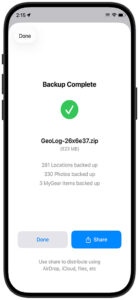
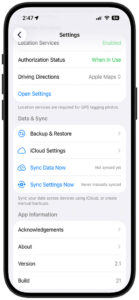
- Open Settings → Backup & Restore → Create Backup.
- When the “Backup Complete” screen appears, tap Share → Save to Files.
- Important:
- Do not save the backup inside the GeoLog folder.
- If you ever need to delete and reinstall the app, the GeoLog folder is removed as well.
- Instead, save to iCloud Drive or any other folder outside the GeoLog directory.
- After saving, return to GeoLog and tap Done.
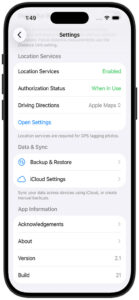
Step 2 — Enable iCloud Sync on Your iPhone
- Go to Settings → iCloud Settings → Enable iCloud Sync.
- GeoLog will prompt you to restart the app. Confirm and relaunch GeoLog.
Step 3 — Install GeoLog on Your iPad
If you haven’t already, download GeoLog from the App Store onto your iPad.
Step 4 — Enable iCloud Sync on Your iPad
- Open Settings → iCloud Settings → Enable iCloud Sync.
- Restart GeoLog when prompted.
Step 5 — Allow Time for Syncing
Launch GeoLog on your iPad. You may initially see “No Nearby Location” — this is normal.
Within a minute or two, your locations will begin downloading and the Home screen will populate automatically.
Optional: Syncing Full‑Size Images
GeoLog stores locations and thumbnails directly in iCloud. Full‑size images are larger and must be uploaded separately.
To enable full‑size image syncing:
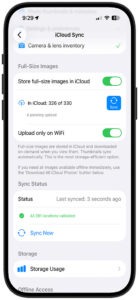
- On your iPhone, open Settings → iCloud Settings → Store full‑size images in iCloud.
- Uploading begins immediately. The time required depends on how many photos you have.
- Example: ~300 photos may take around 10 minutes.
- A progress bar will show your upload status.
- If you see something like “In iCloud: 300 of 330, 4 pending upload”, tap the blue Sync button to finish.
- You may need to tap Sync more than once.
Once complete, your iPad will download full‑size images on demand whenever you tap a thumbnail in Location Details or Gallery.
Backing Up After Syncing
Always create backups from your iPhone, your primary device.
If you added photos on your iPad, first go to:
Settings → iCloud Settings → Download All iCloud Photos
This ensures your iPhone has the complete photo set before you create a new backup.
Manual Sync Tools
If your iPhone or iPad appear out of sync, GeoLog includes two manual sync options to help resolve common issues:
- Sync Data Now
Syncs your Locations, Photos, and MyGear entries. - Sync Settings Now
Syncs your app settings across devices.
These tools are especially useful if you’ve taken photos while not connected to Wi-Fi. In such cases, full-size images may not have uploaded yet — even though thumbnails and metadata appear synced. Manual sync ensures everything is pushed to iCloud.
Checking Upload Status for Full‑Size Images
To verify whether full-size images are pending upload:
- Go to Settings → iCloud Settings
- In the Full‑Size Images section, you’ll see:
- The number of images stored in iCloud
- Any pending uploads
- A blue Sync button to manually trigger the upload
You can also enable or disable “Upload only on Wi-Fi” depending on your data preferences.
Once uploaded, full-size images are downloaded on demand when viewed on your other devices.