
Manual Table Of Contents
- Design Philosophy
- Quick Start
- Location Details
- Settings
- Components
- Additional Information
- Advanced
Overview
The GeoLog Camera is your field companion for scouting locations and planning equipment needs. Unlike a traditional camera app, GeoLog Camera is designed specifically for photographers who want to capture location context and visualize how their main camera gear will frame a scene—all while creating organized location records for future reference.
iPhone Only: The camera feature is only available on iPhone, where it serves as your primary field tool for location scouting and documentation.
The GeoLog Camera Workflow
GeoLog Camera operates on a simple principle: all photos taken in one session belong to the same location. This mirrors real-world photography—when you stop to photograph a scene, you typically take multiple shots from the same general area, including context photos like signage, plaques, or reference shots that help when planning your return trip.
Single Session = Single Location
When you use the GeoLog Camera:
- All photos taken before exiting the camera are grouped together
- The first photo is designated as the main photo by default
- All subsequent photos become gallery photos
- You can change the main photo selection before confirming
- GeoLog calculates the average GPS position from all photos to determine the location coordinates
This approach prevents creating dozens of nearly-identical locations when you’re walking around a single subject, while preserving all your context photos for future reference.
Real-World Example: The Scituate Lighthouse
Let’s walk through a typical scenario. You’re out riding your bicycle and notice the Scituate Lighthouse under construction. You don’t have your main camera with you, but you want to capture this opportunity and plan for a return visit with proper equipment.
Step 1: First Shot
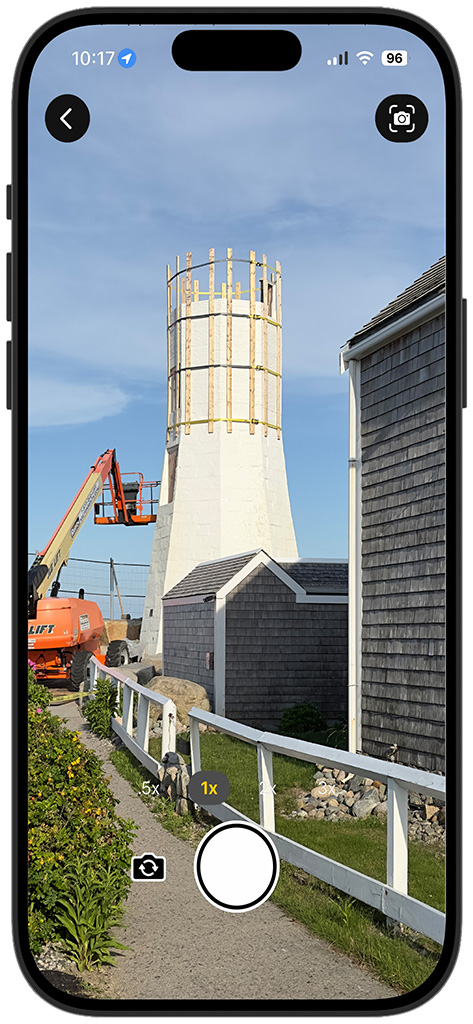
You stop and open Menu → Camera in GeoLog. The viewfinder shows the scene clearly—the lighthouse with construction equipment. You take your first photo to capture the basic composition.
At this point, you’re thinking about your return trip. Will your 24-70mm zoom work here? Should you bring the 70-200mm instead?
Step 2: Visualizing Your Gear
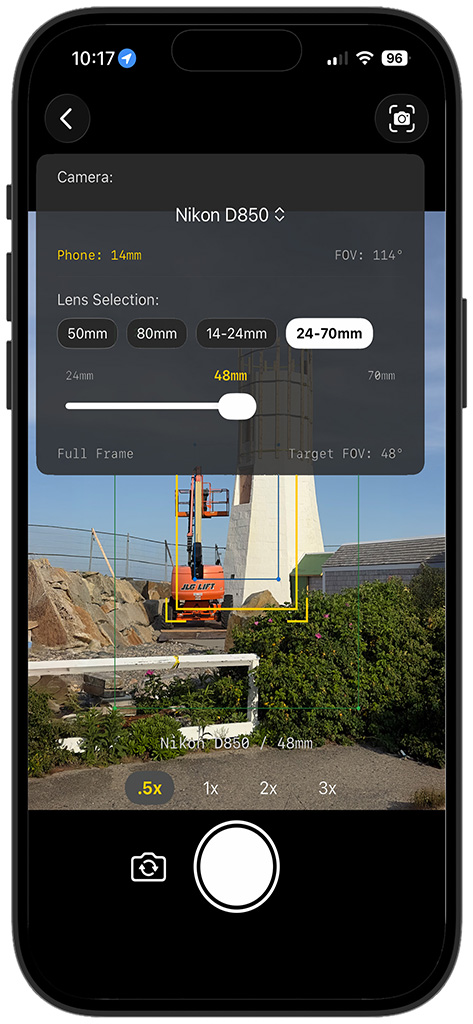
You move in a little closer for better framing. Before taking the next shot, you tap the camera icon in the upper-right corner. This opens the Crop Marks dialog.
In the Crop Marks dialog:
- Select your camera body (Nikon D850)
- Choose your lens from the available options (24-70mm)
- Since it’s a zoom lens, use the slider to adjust focal length
As you slide to 48mm, you see:
- The yellow crop marks overlay showing exactly what your full-frame D850 will capture
- Phone FOV (114°) showing the iPhone’s native field of view in yellow text
- Current focal length (48mm) highlighted in yellow on the slider
- Target FOV (48°) showing what your main camera will see
- Sensor format (Full Frame) displayed at bottom
- Zoom multipliers (.5x, 1x, 2x, 3x) for the iPhone camera
The crop marks update in real-time as you adjust the slider, letting you instantly see if this lens choice will work for the scene.
Tap anywhere on the screen to dismiss the dialog—the crop marks remain visible while you compose. Take your photo with the crop marks showing.
Understanding the Display:
- The yellow rectangle shows your camera’s actual frame
- Everything outside the rectangle will be cropped out when you use your real camera
- This helps you plan composition and decide if you need a different lens for your return visit
Step 3: Capturing Context
You continue taking photos without crop marks—two shots of informational signs explaining the restoration project. These context photos will help you remember details about the location and provide information useful for social media posts, print descriptions, or planning discussions.
All four photos remain part of the same camera session because you haven’t exited the camera yet.
Step 4: Reviewing and Selecting
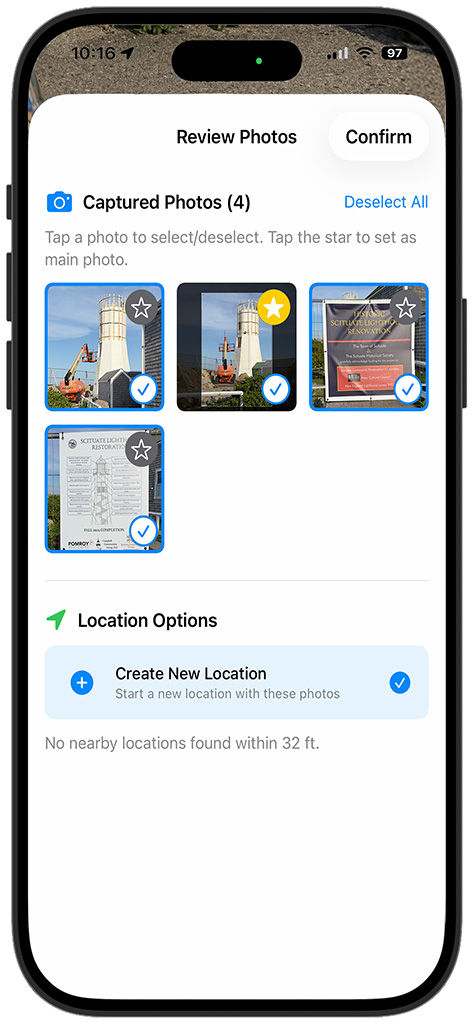
When you tap the back button (<) in the upper-left corner, GeoLog presents the Review Photos screen.
On this screen you can:
- View all captured photos (4 in this example)
- See which photo is currently the main photo (star icon)
- Select/deselect individual photos (blue checkmark)
- Change the main photo by tapping a different star
In this case, the first photo is selected by default, but you prefer the second photo—the one you took with crop marks active. Tap the star icon on that photo to make it the main photo. This is the image that will represent the location in map pins, lists, and search results.
Why this matters: The main photo should be your best composition or the shot that most clearly shows what makes this location worth returning to. Support photos (signs, context shots, alternate angles) become gallery photos.
Step 5: Location Options
After selecting your main photo, tap Confirm.
GeoLog now checks for nearby locations using the Gallery Distance setting (found in Settings → Gallery Distance). This is a radius calculated from the average GPS coordinates of all photos in your session.
Gallery Distance Default: 70 meters (230 feet)
If nearby locations are found within this radius:
- GeoLog displays them as options
- You can choose to add your new photos to an existing location (as gallery photos)
- Or create a new separate location
If no nearby locations exist:
- GeoLog displays “No nearby locations found within [distance]”
- Your only option is “Create New Location” (automatically selected)
- Tap Confirm to proceed
In this example, no nearby locations exist, so GeoLog creates a new location with your four photos.
Why Gallery Distance matters: This prevents duplicate locations when you’re walking around the same subject. If you photographed the lighthouse last month and are now 50 feet away photographing it from a slightly different angle, you probably want to add these photos to your existing “Scituate Lighthouse” location rather than creating “Scituate Lighthouse 2.”
Step 6: Location Created
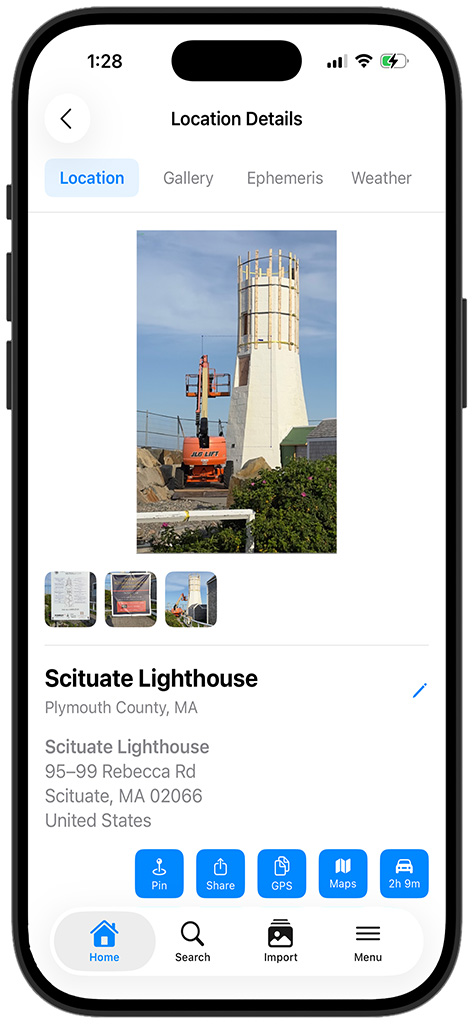
GeoLog automatically creates your location with:
- Title: “Scituate Lighthouse” (from reverse geocoding)
- Subtitle: “Plymouth County, MA”
- Full address: Complete street address of your camera position
- Main photo: The image you selected (lighthouse with crop marks)
- Gallery photos: Three thumbnails showing your support images
The location is immediately available in your library, fully tagged with GPS coordinates, timestamp, and all metadata.
Quick Actions Available:
- Pin – Mark as favorite
- Share – Send location to others
- GPS – Copy coordinates to clipboard
- Maps – Open in Apple Maps
- Navigation – Get driving directions
Step 7: Viewing the Crop Mark Reference
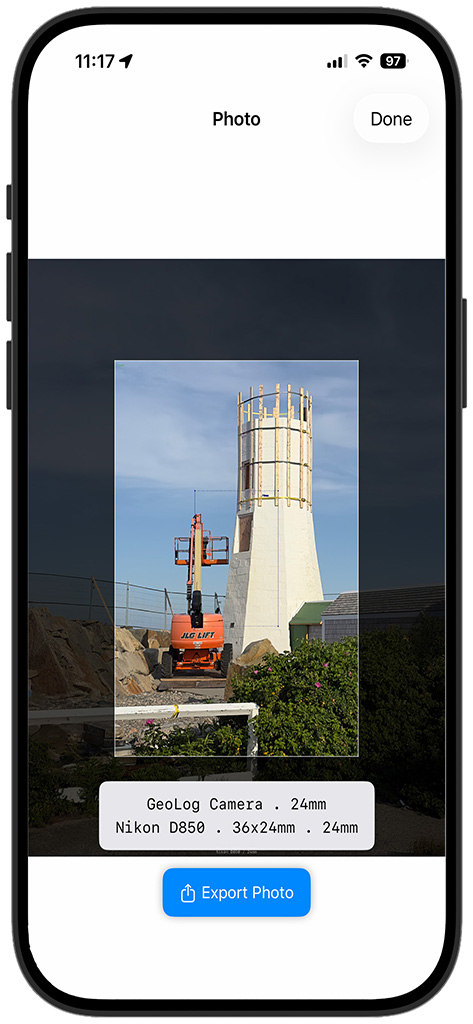
Tap the main photo to view it full-screen. Here you see:
- The complete iPhone photo
- The yellow crop marks showing your D850’s frame
- Camera information overlay at the bottom showing:
- “GeoLog Camera . 24mm” (iPhone specs)
- “Nikon D850 . 36x24mm . 24mm” (your planned gear)
Using this view:
- Pinch to zoom in and examine fine details
- Verify the composition will work with your planned lens
- Check critical elements that must stay within the frame
- Study the edges to see what you’ll lose when cropping to your camera’s sensor
This is particularly valuable for:
- Architectural photography – ensuring buildings don’t get cropped awkwardly
- Landscape photography – checking foreground/background balance
- Wildlife photography – understanding how close you’ll need to be
- Sports/action photography – planning where to position yourself
You can also tap the gallery photo thumbnails to view them full-screen. Pinch to zoom in on the informational signs to read the text—this is why capturing context photos matters. When you’re back home planning your return trip, you can review all the details without relying on memory.
Understanding Session-Based Grouping
The camera groups all photos taken in one session because it assumes:
- You’re at a single location (even if walking around)
- You’re photographing the same subject or related subjects
- Some photos are compositional, others are contextual
- All photos share a common purpose—documenting this location
What counts as “one session”:
- Everything from opening the camera until you tap the back button
- Multiple shots with different lenses/crop marks
- Moving around within the immediate area
- Taking reference photos of signs, plaques, or context
When to start a new session:
- When you’ve moved to a genuinely different location (beyond Gallery Distance)
- When you’re photographing a completely different subject
- After you’ve confirmed and saved the current location
Example scenarios:
Single Session (correct):
- Wide shot of a waterfall
- Telephoto preview with crop marks
- Close-up of the trail sign
- Photo of the parking area
- Result: One location called “Bash Bish Falls” with four gallery photos
Multiple Sessions (correct):
- Photograph waterfall, exit camera, confirm location
- Walk 500 feet to overlook, open camera again
- Photograph valley view, exit camera, confirm
- Result: Two locations – “Bash Bish Falls” and “Bash Bish Falls Overlook”
Crop Marks Deep Dive
The crop marks feature is what sets GeoLog Camera apart from standard camera apps. It’s designed to answer the critical question: “What lens do I need when I come back?”
Opening Crop Marks
Tap the camera icon in the upper-right corner of the viewfinder at any time during your session.
Selecting Your Camera
At the top of the dialog, you’ll see “Camera:” with your selected camera body. Tap the camera name (e.g., “Nikon D850 ◇”) to change cameras if you have multiple bodies configured.
The dialog shows:
- Phone: Your iPhone’s equivalent focal length and field of view
- FOV: Your camera’s current field of view in degrees
Choosing Your Lens
Fixed Focal Length Lenses: Tap the button for your desired lens (e.g., “50mm”, “80mm”). The crop marks immediately adjust to show that lens’s coverage.
Zoom Lenses:
- Tap the zoom lens button (e.g., “24-70mm”)
- Use the slider to select your focal length
- Watch the yellow crop marks resize in real-time
- The current focal length appears in yellow above the slider
Slider details:
- Left label: Minimum focal length (e.g., “24mm”)
- Center label: Current position in yellow (e.g., “48mm”)
- Right label: Maximum focal length (e.g., “70mm”)
- Bottom display: “Full Frame” and “Target FOV: 48°”
Understanding the Overlay
Once you’ve selected a lens, the screen shows:
- Yellow rectangle: Exact frame your camera will capture
- Dimmed area outside: What will be cropped out
- Zoom multipliers: iPhone camera zoom levels (.5x, 1x, 2x, 3x)
- Camera label: “Nikon D850 . 48mm” at the bottom
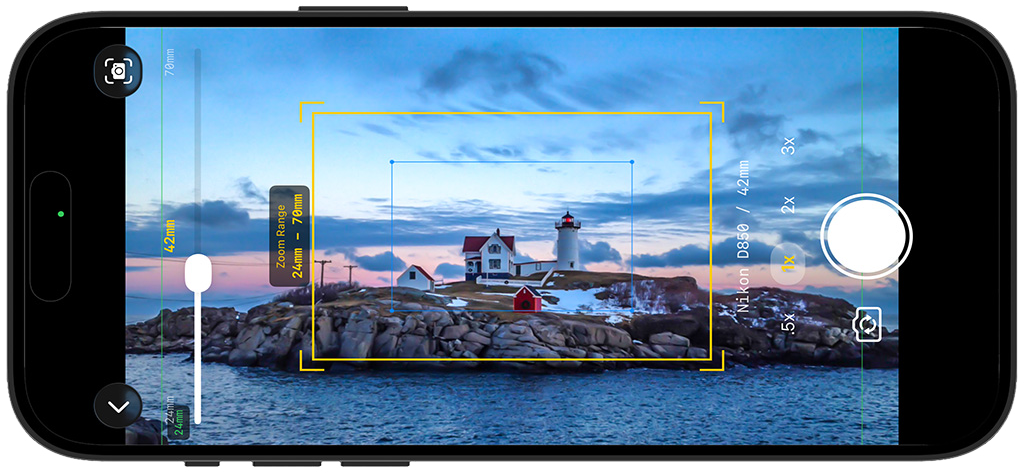
The Focal Length Slider
GeoLog v2.3 adds a dedicated focal length slider directly on the viewfinder — no need to open the Crop Marks dialog every time you want to adjust zoom. Once a zoom lens is active, the slider appears along the left edge of the viewfinder and stays visible while you compose.
Reading the slider:
- The white thumb shows your current focal length position within the zoom range
- The current focal length appears in yellow at the top of the slider (e.g., 42mm)
- The minimum focal length (wide end) appears at the bottom of the slider track (e.g., 24mm)
- The maximum focal length (telephoto end) appears at the top right of the viewfinder (e.g., 70mm)
- A zoom range tooltip (e.g., “Zoom Range 24mm – 70mm”) appears while dragging to confirm which lens is active
- The camera and focal length label (e.g., “Nikon D850 / 42mm”) updates on the right side of the viewfinder in real time
Using the slider:
Drag the white thumb up toward the telephoto end or down toward the wide end. The yellow crop marks rectangle resizes instantly — no dialog required. This lets you find the right focal length and compose your shot in a single fluid motion.
Collapsing the slider:
Tap the ∨ chevron at the bottom of the slider to collapse it and clear the viewfinder for composing. Tap it again to bring the slider back.
Important: The focal length slider controls your camera body simulation — it determines what the crop marks show. It is independent of the iPhone zoom controls (.5x, 1x, 2x, 3x) on the right side of the viewfinder, which control only the iPhone’s optical zoom and do not affect the crop marks.
Visual interpretation:
- If the subject fits comfortably in the yellow box → This lens works
- If the subject is too small in the box → You need a longer lens
- If the subject is cut off by the box → You need a wider lens
Dismissing the Dialog
Tap anywhere on the screen outside the dialog to dismiss it. The crop marks remain visible, allowing you to compose your shot precisely within your camera’s actual frame.
Taking Photos With Crop Marks
With crop marks active, compose your shot so the most important elements fall within the yellow rectangle. This is exactly what your camera will capture when you return with that lens.
The crop marks remain visible until you:
- Open the dialog again and select a different lens
- Close the camera and start a new session
- Take a photo (they’ll reappear when you’re ready for the next shot)
iPhone Zoom Controls
The .5x, 1x, 2x, and 3x buttons at the bottom control your iPhone’s camera zoom, not your camera body lens simulation. Use these to:
- Get closer to your subject when you can’t physically move
- Adjust framing while keeping crop marks proportionally correct
- Match your iPhone’s field of view to your planned composition
Important: Zooming your iPhone doesn’t change the crop marks—they remain calibrated to your selected camera and lens regardless of iPhone zoom level.
Gallery Distance Settings
Understanding Gallery Distance helps you control when GeoLog suggests adding photos to existing locations versus creating new ones.
Where to find it: Settings → Gallery Distance
What it does: When you exit the camera, GeoLog calculates the average GPS position of all photos in your session, then searches for any existing locations within the Gallery Distance radius.
Default setting: 70 meters (230 feet)
How it works in practice:
Example 1 – Same location:
- You photographed Acadia’s Thunder Hole last month
- Today you’re 40 meters away photographing it from a different angle
- Gallery Distance: 70 meters
- Result: GeoLog suggests adding photos to existing “Thunder Hole” location
Example 2 – New location:
- You photographed Thunder Hole (saved as location)
- You walk 100 meters to Otter Cliff
- Gallery Distance: 70 meters
- Result: No nearby locations found, creates new “Otter Cliff” location
Adjusting for your workflow:
Smaller radius (30-50 meters):
- Good if you want separate locations for different viewpoints of the same subject
- Useful for urban photography where 50 meters is a different street
- Better for sports venues where different positions matter
Larger radius (100-200 meters):
- Good if you want all photos from a general area grouped together
- Useful for landscape photography where you’re working the same scene
- Better for events where you’re moving around one location
Consider your subject:
- Architectural photography: Smaller radius (different angles = different locations)
- Landscape photography: Larger radius (same valley, different spots)
- Wildlife photography: Medium radius (same habitat area)
- Street photography: Smaller radius (different blocks matter)
Camera Settings and Configuration
Before using crop marks effectively, you need to configure your camera gear in GeoLog.
Setting up your gear: Menu → Gear → Add Camera/Lens
For each camera body, specify:
- Camera name
- Sensor format (Full Frame, APS-C, Medium Format, etc.)
- Sensor dimensions (width × height in mm)
For each lens, specify:
- Lens name
- Focal length (single number for primes, range for zooms)
- Compatible camera bodies
Once configured, these cameras and lenses appear in the Crop Marks dialog, ready to use for field visualization.
Working Without Cell Service
GeoLog doesn’t require network connectivity to capture photos and GPS coordinates, but it does need a network connection for reverse geocoding—the process that converts GPS coordinates into human-readable addresses and location names.
Unknown Location Handling
When you capture photos without cell service:
- GeoLog saves the photos with GPS coordinates
- The location is created with the title “Unknown Location”
- Address fields remain empty until you have connectivity
Retry Button
When you view an “Unknown Location” in the Location Details screen, you’ll see a retry button in the address area. This button has three color states:
Yellow Button – No Network Available:
- The device currently has no network connectivity
- Tapping the button will not perform any action
- Wait until you have cell service or Wi-Fi
Green Button – Ready to Retry:
- Network connectivity is available
- Tap the button to attempt reverse geocoding
- GeoLog will query the geocoding service with the saved GPS coordinates
- If successful, the location title and address will update automatically
Red Button – Geocoding Failed:
- The geocoding service could not identify this location
- This is extremely rare—even remote coordinates typically return results
- Examples of successful geocoding: Antarctica, middle of Pacific Ocean, remote wilderness
- The service returns something even for ocean coordinates (e.g., “Pacific Ocean”)
- You can still retry by tapping the red button in case the service database has been updated
Why geocoding might fail:
- Invalid GPS coordinates (corrupted data)
- Temporary service outage
- Extremely recent geographic changes not yet in the database
Practical tip: Even if geocoding fails, your GPS coordinates are preserved. You can manually edit the location title and add notes about where you were, or copy the GPS coordinates and look them up in other mapping services.
Offline Strategy
If you frequently photograph in areas without cell service:
- Accept “Unknown Location” titles initially
- Add detailed notes in the location while still on-site (notes don’t require network)
- When you return to connectivity, review all “Unknown Location” entries
- Tap the retry button for each to populate proper addresses
- Edit titles as needed to match your naming preferences
The GPS coordinates are always accurate regardless of geocoding status—they’re captured directly from the iPhone’s GPS receiver, not from the network.
Tips for Effective Camera Use
Always include context photos: Photograph signs, plaques, trail markers, parking areas, or anything that helps you relocate or understand the location later. These gallery photos are invaluable when planning return trips or sharing location information with others.
Use crop marks for every “maybe” lens: Not sure if 50mm or 85mm is better? Take one photo with each lens’s crop marks active. When you review at home, you’ll have visual references for both options.
Change main photos later: You can always change which photo is the main photo after creating the location. Go to Location Details → Gallery tab → tap a different photo’s star icon.
Trust the grouping: Don’t overthink whether photos “belong together.” If you took them in one session while exploring a location, they belong together. Gallery Distance handles the edge cases.
Review crop marks at home: When planning your return trip, open the main photo full-screen to review the crop mark overlay. This confirms your lens choice and helps you pack the right gear.
Combine with other tools: After creating a location with the camera, use the Ephemeris tab to plan optimal lighting times, or add notes about equipment needs, weather preferences, or composition ideas.
Use the viewfinder slider to dial in focal length while composing: With a zoom lens active, drag the left-edge slider to adjust focal length without opening any dialog. Watch the crop marks resize in real time as you find the composition that works. Tap the ∨ chevron to collapse the slider when you’re ready to shoot.
Common Questions
Q: Can I use the camera on iPad? No, the camera feature is iPhone-only. The iPad version (GeoPad) is designed for planning and review, not field capture.
Q: What if I want separate locations for each photo? Use the Import feature instead of the Camera. Import treats each photo as a separate location, while Camera groups session photos together.
Q: Can I add more photos to a location later? Yes, there are several ways to add photos to existing locations:
- Use Camera near the location: When you exit the camera within Gallery Distance of an existing location, GeoLog will offer to add your new photos to that location as gallery photos.
- Exit camera after each photo: If you’re at a location with different compositions (for example, two different photography competition entries at the same spot), you can exit the camera after each shot. GeoLog will offer to add each subsequent photo to the existing location, allowing you to carefully curate which photos belong together.
- Import and manually select: Use the Import feature and manually choose the destination location when prompted.
Q: What if I don’t have cell service? GeoLog will mark the location as “Unknown Location” and save it with GPS coordinates. When you later view that location with network connectivity available, a retry button appears in the address area:
- Yellow button: No network currently available, retry not possible
- Green button: Network available, tap to retry geocoding
- Red button: Geocoding failed (very rare), but you can still retry in case the service database was updated
Even coordinates in Antarctica or the middle of the Pacific Ocean typically return valid addresses, so red buttons are highly unlikely. Your GPS coordinates are always preserved regardless of geocoding status.
Q: Do crop marks affect the saved photo? Yes. When you take a photo with crop marks active, GeoLog saves two versions:
- Main photo: The cropped version showing only what your selected camera will capture
- Gallery photo: The full-size iPhone photo with yellow crop marks highlighted as an overlay
This gives you both a clean preview of your final composition and a reference showing the full field of view with crop marks visible. Note that GeoLog Camera does not perform computational photography processing like the native iOS camera app—it’s a research and planning tool, not a final output camera.
Q: Are GeoLog photos added to my Photos library? No. Photos taken with the GeoLog Camera are stored within the GeoLog app only, not in your system Photos library. This keeps your location scouting work separate from your finished photography.
When viewing the full-size photo or any gallery photo, you’ll see an Export Photo button. Tap this to save that specific photo to your Photos library if you want to keep it, share it, or edit it in other apps.
Q: Can I turn off crop marks once activated? Yes, there are two ways to clear crop marks:
- Start a new camera session: Crop marks automatically clear when you exit the camera and start fresh
- Use the Crop Marks dialog: Open the crop marks dialog (camera icon) and deselect your camera choice. The crop marks will immediately disappear from the viewfinder.
Crop marks remain visible only as long as you want them during your current session.
Q: What if reverse geocoding gets the title wrong? Tap the edit button (pencil icon) next to the location title and change it to whatever you prefer. The GPS coordinates remain accurate regardless of the title.
Q: How accurate are the crop marks? Crop marks are calculated using your camera’s sensor dimensions and lens focal length, accounting for the iPhone’s sensor size and field of view. They’re accurate enough for field planning, though minor variations may occur due to lens breathing or focus distance.
The GeoLog Camera transforms your iPhone into a professional location scouting tool. By combining GPS-tagged photography with visual gear planning, you can make informed decisions about equipment needs before investing time in a return trip. Every photo session builds your location library, creating a valuable reference system for your photography workflow.