

Manual Table Of Contents
- Design Philosophy
- Quick Start
- Location Details
- Settings
- Components
- Additional Information
- Advanced
GeoLog includes a comprehensive backup and restore system that protects your location library, photos, camera gear configurations, and notes. Whether you’re switching devices, protecting against data loss, or migrating to a new version of the app, the backup system ensures your photography location data is safe and portable.
Access Backup & Restore by tapping Menu → Backup & Restore.
Understanding GeoLog Backups
What’s Included in a Backup
A GeoLog backup is a single ZIP file containing:
Location Data:
- All saved locations with titles, addresses, and GPS coordinates
- Location notes and ratings
- Pin status and organization
- Timestamps and metadata
Photo Data:
- All photos taken with GeoLog Camera or imported
- Full-resolution images with complete metadata
- Main photo and gallery photo relationships
- Photo notes and timestamps
- GPS coordinates and heading information for each photo
- Placemark data (reverse geocoded addresses)
- Crop mark information from camera viewfinder
- Photo library export status
Camera Gear:
- All configured camera bodies with sensor specifications
- All configured lenses with focal lengths
- Camera and lens relationships
- Custom gear names and settings
Settings:
- Display format preferences (date, time, GPS, distance units)
- Photography settings (aperture, exposure increments)
- Gallery Distance and Pin Distance values
- All other app preferences
What’s NOT Included
System Data:
- iCloud sync status (this is device-specific)
- Temporary cache files
- App installation data
External Data:
- Photos in your iOS Photos library (only GeoLog’s internal photos are backed up)
- Third-party app data
- System settings outside GeoLog
Here’s the corrected section about backup filenames:
Backup File Format
Backups are saved as ZIP files with a compact, date-encoded naming convention:
GeoLog-[year]x[time].zip
Example: GeoLog-26x9586.zip
Understanding the filename:
26= Year 2026 (last two digits of the year)x= Separator9586= Hexadecimal representation of minutes elapsed since January 1st
This compact format encodes the complete date and time while keeping filenames short and readable. The hexadecimal time component creates unique filenames for each backup while avoiding the clutter of traditional date formats like GeoLogBackup-2026-01-28-19-25.zip.
Why this format: Traditional timestamp filenames become difficult to read when you have multiple backups:
- Hard to read:
GeoLogBackup-2026-01-28-09-18-25.zip - Easy to read:
GeoLog-26x9586.zip
The shortened format makes it easier to identify and manage backup files at a glance, while still preserving precise timing information.
Decoding the timestamp: While the hex encoding isn’t meant to be manually decoded, the Files app and GeoLog’s Backup & Restore screen show helpful context:
- Recently created backups show age (e.g., “5 hr, 5 min”)
- File creation dates are visible in the Files app
- The compact name prevents visual clutter when managing many backups
The file extension .zip makes it compatible with standard compression tools on any platform.
You can replace the existing “Backup File Format” section with this corrected version. The rest of the document remains accurate.
Creating a Backup
Step 1: Open Backup & Restore
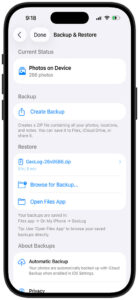
Navigate to Menu → Backup & Restore. The Backup & Restore screen shows your current status.
Current Status Section:
- Photos on Device: Shows total number of photos in GeoLog (e.g., “286 photos”)
This gives you a quick overview of how much data will be included in the backup.
Step 2: Start the Backup
Tap “Create Backup” in the Backup section.
What happens:
- GeoLog begins packaging all locations, photos, camera gear, and settings
- A progress indicator appears (on the main Backup & Restore screen or as a separate progress view)
- The ZIP file is created in memory
- Once complete, the backup success screen appears
Time estimate: Backup time depends on the number of photos and their sizes:
- Small library (< 50 photos): A few seconds
- Medium library (50-200 photos): 10-30 seconds
- Large library (200-500 photos): 30-90 seconds
- Very large library (500+ photos): 1-3 minutes
Step 3: Backup Complete
When the backup finishes, you’ll see a success screen showing:
Backup Details:
- Filename (e.g., “GeoLog-26x9cde.zip”)
- File size in megabytes (e.g., “459.7 MB”)
- Number of locations backed up (e.g., “270 Locations backed up”)
- Number of photos backed up (e.g., “286 Photos backed up”)
- Number of camera gear items backed up (e.g., “4 MyGear items backed up”)
Action Buttons:
- Done: Returns to Backup & Restore screen
- Share: Opens iOS share sheet to save or send the backup
Step 4: Save Your Backup
Tap the “Share” button to save your backup file. The iOS share sheet appears with multiple options:
Recommended Storage Locations:
iCloud Drive:
- Tap “Save to Files” → “iCloud Drive” → Choose folder
- Accessible from any device signed into your iCloud account
- Automatically synced across devices
- Good for long-term storage and device switching
Files App → On My iPhone:
- Tap “Save to Files” → “On My iPhone” → “GeoLog” folder
- Stored locally on your device
- Quick access for immediate restore
- Not automatically backed up (unless iCloud Backup is enabled)
Third-Party Cloud Services:
- Dropbox, Google Drive, OneDrive, etc.
- Cross-platform access
- Additional redundancy
- Good for sharing with others
AirDrop:
- Send to another iOS/Mac device immediately
- Good for quick transfers between your devices
- No internet required
Email:
- Attach to email for off-site backup
- May fail for very large backups (most email has size limits around 25-50 MB)
- Good for small libraries or sharing specific backups
Pro Tip: Save backups to multiple locations for redundancy. A copy in iCloud Drive plus a copy in Dropbox ensures you can recover even if one service is unavailable.
Default Backup Location
The description text on the Backup & Restore screen states:
Your backups are saved in:
Files app → On My iPhone → GeoLog

Tip: Use 'Open Files App' to browse your saved backups directly.
Using Open Files App: Tap “Open Files App” in the Restore section to navigate directly to the default backup location. This opens the Files app to:
On My iPhone → GeoLog
You’ll see all your saved backup files listed with timestamps, making it easy to identify and select the backup you want to restore.
Restoring from a Backup
When to Restore
Common restore scenarios:
- Switching to a new iPhone or iPad
- Recovering after reinstalling GeoLog
- Restoring data after accidental deletion
- Migrating from an older version of GeoLog
- Testing backup integrity
- Syncing data between devices manually
Step 1: Access Restore Options
From the Backup & Restore screen, you have two ways to select a backup file:
Option A: Select Recent Backup If you recently created a backup, it appears in the Restore section with:
- Filename (e.g., “GeoLog-26×9586.zip”)
- Age indicator (e.g., “5 hr, 5 min”)
- Right arrow (tap to select this backup)
Option B: Browse for Backup Tap “Browse for Backup…” to open the Files app and navigate to any backup file, regardless of location:
- On My iPhone
- iCloud Drive
- Other cloud services
- Recently shared files
Step 2: Choose Restore Method
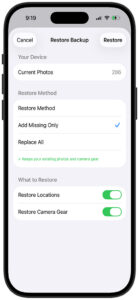
After selecting a backup file, the Restore Backup sheet appears showing your options.
Your Device Section:
- Current Photos: Shows how many photos currently exist in GeoLog (e.g., “286”)
This helps you understand what will be affected by the restore.
Restore Method:
Add Missing Only (Recommended) ✓
- Default selection
- Adds locations, photos, and gear from the backup that don’t currently exist
- Keeps all your existing data intact
- Safe option that won’t delete anything
- Ideal for merging backup data with current data
Use cases for Add Missing Only:
- Restoring after accidentally deleting some locations
- Merging data from another device
- Recovering from a partial data loss
- Adding back locations you deleted but now want restored
Replace All
- Deletes all current locations, photos, and camera gear
- Replaces everything with the backup contents
- Complete clean slate restore
- Use with caution—this is destructive
Use cases for Replace All:
- Setting up a new device from scratch
- Recovering from complete data corruption
- Starting fresh with a known-good backup
- Testing a backup’s integrity on a secondary device
Important warning: When “Add Missing Only” is selected, green text appears:
✓ Keeps your existing photos and camera gear
This confirms that your current data is safe. When “Replace All” is selected, this text disappears, indicating the destructive nature of this option.
Step 3: Choose What to Restore
What to Restore Section:
Restore Locations (Toggle, ON by default)
- Restores all location data from backup
- Includes location names, addresses, coordinates
- Includes notes, ratings, pin status
- Links restored photos to their locations
Restore Camera Gear (Toggle, ON by default)
- Restores all camera bodies from backup
- Restores all lenses from backup
- Includes custom names and configurations
- Required for crop marks to display properly
Typical use: Leave both toggles enabled for a complete restore. You might disable one if:
- You only want to recover locations without changing your camera gear setup
- You only want to add camera gear configurations without touching locations
Step 4: Confirm and Restore
Tap “Restore” in the upper-right corner to begin the restore process.
What happens:
- GeoLog extracts the ZIP file
- Verifies backup integrity
- Processes location data
- Processes photo data and saves images to app storage
- Processes camera gear data
- Links photos to locations
- Updates the database
Progress: The restore process shows progress indicators as it works through the backup data.
Time estimate: Restore time depends on backup size and restore method:
- Small backup (< 50 photos): 5-10 seconds
- Medium backup (50-200 photos): 20-60 seconds
- Large backup (200-500 photos): 1-3 minutes
- Very large backup (500+ photos): 3-10 minutes
Note: “Add Missing Only” is typically faster than “Replace All” because it only processes data that doesn’t already exist.
Step 5: Restore Complete
When the restore finishes, you’re returned to the Backup & Restore screen. Your locations, photos, and camera gear are now restored.
Verify the restore:
- Tap Home to view Nearby Locations
- Check that locations appear as expected
- Tap into a few locations to verify photos and notes
- Go to Menu → Gear to confirm camera bodies and lenses
Understanding “Add Missing Only” vs “Replace All”
Add Missing Only (Safe Method)
How it works: GeoLog compares the backup contents with your current data:
- Locations with IDs that don’t exist → Added
- Photos with IDs that don’t exist → Added
- Camera gear with IDs that don’t exist → Added
- Everything else → Left unchanged
Example scenario: You have 100 locations currently. Your backup contains 120 locations, and 80 of them match your current locations.
Result:
- Your 100 current locations remain untouched
- The 40 locations from backup that don’t currently exist are added
- Total: 140 locations (100 original + 40 from backup)
Advantages:
- No data loss—everything is preserved
- Safe to run multiple times
- Good for merging data from multiple devices
- Ideal for recovering accidentally deleted items
Disadvantages:
- Can create duplicates if backup has different versions of same locations
- Doesn’t update existing locations with backup versions
- May result in more data than expected
Replace All (Clean Slate Method)
How it works:
- GeoLog deletes all current locations, photos, and camera gear
- GeoLog restores everything from the backup
- Final state exactly matches the backup contents
Example scenario: You have 100 locations currently. Your backup contains 80 locations.
Result:
- Your 100 current locations are deleted
- The 80 locations from backup are restored
- Total: 80 locations (exactly what was in the backup)
Advantages:
- Clean, predictable result
- Exact replication of backup state
- No duplicates or conflicts
- Good for starting fresh
Disadvantages:
- Destroys all current data
- Cannot be undone
- Any data not in the backup is permanently lost
- Requires careful verification before use
Which Method to Choose?
Use “Add Missing Only” when:
- Recovering from accidental deletion of some (not all) locations
- Merging backup data with current work
- You’re not sure what’s in the backup vs current data
- You want to be safe and preserve everything
- Adding locations from a different device or older backup
Use “Replace All” when:
- Setting up a new device from a complete backup
- You know the backup is the definitive version you want
- Current data is corrupted or problematic
- Starting completely fresh
- Testing a backup on a secondary device
When in doubt: Use “Add Missing Only”. It’s non-destructive and can always be followed up with manual cleanup if needed.
Automatic Backup with iCloud
About Automatic Backup Section
The Backup & Restore screen includes information about iOS’s built-in backup system:
Automatic Backup
Your photos are automatically backed up with iCloud
Backup when enabled in iOS Settings.
What this means: When iCloud Backup is enabled for your device (Settings → [Your Name] → iCloud → iCloud Backup), iOS automatically backs up GeoLog’s app data, including:
- All location data
- All photos stored in GeoLog
- App settings
- Camera gear configurations
How it works:
- Automatic backups occur when your device is:
- Connected to Wi-Fi
- Connected to power
- Screen locked
- Has sufficient iCloud storage
Relationship to GeoLog backups: iCloud Backup and GeoLog’s manual backup/restore feature serve different purposes:
iCloud Backup (automatic):
- System-level backup of entire app
- Restores when setting up a new device
- Not portable between users
- Requires iCloud storage space
- No control over timing or content
GeoLog Backup (manual):
- App-level export to ZIP file
- Portable—can be shared, stored anywhere
- Selective restore options (Add Missing Only vs Replace All)
- Complete control over when and what to backup
- Independent of iCloud storage
- Can be saved to any cloud service or local storage
Best practice: Use both. iCloud Backup provides automatic protection, while GeoLog’s manual backup gives you portable, shareable files and more control over the restore process.
Privacy and Backup Security
The Backup & Restore screen includes a Privacy section with information about data handling:
What GeoLog backups contain:
- Your location data (GPS coordinates, addresses)
- Your photos and their metadata
- Your notes and ratings
- Your camera gear configurations
- All are packaged in an unencrypted ZIP file
Security considerations:
Unencrypted storage: GeoLog backup files are standard ZIP files without encryption. Anyone with access to the file can extract and view the contents.
Protecting your backups:
- Store backups in secure locations (password-protected cloud storage)
- Don’t share backup files with untrusted parties
- Be cautious when emailing backups (email is not secure)
- Use encrypted cloud services for sensitive location data
- Delete old backups you no longer need
If backups contain sensitive locations: Consider using iOS’s encrypted storage options:
- iCloud Drive with two-factor authentication
- Third-party cloud services with encryption
- Password-protected ZIP tools (compress the GeoLog backup into a password-protected archive)
Troubleshooting Common Issues
Backup Won’t Complete
Problem: Backup process starts but never finishes or app crashes.
Possible causes:
- Insufficient storage space on device
- Corrupted photo data
- Very large library (1000+ photos)
Solutions:
- Check available storage: Settings → General → iPhone Storage
- Close other apps to free memory
- Try backing up in smaller batches (delete some locations temporarily, backup, restore them, backup again)
- Restart the app and try again
Restore Adds Duplicate Locations
Problem: After “Add Missing Only” restore, you have duplicate locations with similar names.
Why this happens: “Add Missing Only” compares by unique IDs, not by content. If the same location exists with different IDs (created separately on two devices), both versions are kept.
Solutions:
- Use the “Move Photos to Another Location” feature to consolidate duplicates
- Manually delete unwanted duplicate locations
- Next time, use “Replace All” instead if you want exact backup replication
Backup File Too Large to Email
Problem: Trying to email a backup but it exceeds size limit.
Why this happens: Most email providers limit attachments to 25-50 MB. GeoLog backups with many high-resolution photos can be hundreds of megabytes.
Solutions:
- Use cloud storage instead (iCloud Drive, Dropbox, Google Drive)
- Use AirDrop for transfers between Apple devices
- Compress the backup further with third-party tools
- Split the library into smaller backups
Restore Doesn’t Show All Photos
Problem: Restored locations show in the list but some photos are missing.
Possible causes:
- Corrupted backup file
- Partial backup creation
- Restore interrupted
Solutions:
- Try restoring again from the same backup
- Check the backup completion screen—did it show the expected photo count?
- Create a new backup and verify photo counts before restoring
- Check app storage to ensure photos were actually saved
Camera Gear Doesn’t Appear After Restore
Problem: Locations and photos restored successfully but camera gear is missing.
Cause: The “Restore Camera Gear” toggle was disabled during restore.
Solution:
- Return to Backup & Restore
- Select the same backup file again
- Enable “Restore Camera Gear” toggle
- Choose “Add Missing Only” to preserve your restored locations and photos
- Tap Restore again
Photos Show “Unknown Location” After Restore
Problem: Restored locations show “Unknown Location” or missing address data.
Why this happens: This should not happen with proper backups—location data is included in the backup format. If it does occur, the backup may be from an older version of GeoLog.
Solutions:
- Tap the retry button (green when network is available) to attempt reverse geocoding
- Check that you have network connectivity
- Verify the backup was created with a recent version of GeoLog
Best Practices for Backup Management
Regular Backup Schedule
Recommended backup frequency:
- Daily/Weekly shooters: Backup weekly or after significant shooting sessions
- Occasional users: Backup monthly or before major trips
- Heavy users: Backup after every major import or shooting day
Create a routine: Set a reminder to create backups on a regular schedule. The backup process is quick, and having recent backups ensures minimal data loss if something goes wrong.
Multiple Backup Locations
3-2-1 Backup Rule:
- 3 copies of your data (original + 2 backups)
- 2 different storage types (e.g., iCloud Drive + Dropbox)
- 1 off-site backup (cloud storage)
Example setup:
- Primary data: GeoLog app on iPhone
- Backup 1: iCloud Drive
- Backup 2: Dropbox or Google Drive
This protects against device loss, cloud service issues, or accidental deletion.
Backup Before Major Changes
Always backup before:
- Updating to a new version of GeoLog
- Updating iOS to a major version
- Performing “Replace All” restore operations
- Bulk deleting locations or photos
- Trying experimental features
Having a pre-change backup means you can roll back if something goes wrong.
Verify Backups Periodically
Test your backups: Once a quarter, try restoring a backup on a secondary device or in a test scenario:
- Create a fresh backup
- Note the location count, photo count, and camera gear count
- Verify the ZIP file opens and contains expected folders
- If you have a secondary device, try restoring there
This confirms your backups are valid and the restore process works.
Organize Backup Files
Naming convention: The random IDs in GeoLog backup filenames make organization difficult. Consider:
- Moving backups to dated folders (e.g., “2025-01-28-Backup”)
- Adding context to folder names (e.g., “2025-Q1-Maine-Trip-Backup”)
- Deleting old backups after verifying new ones
Storage structure example:
iCloud Drive
└── GeoLog Backups
    ├── 2025-01-Weekly
    │   ├── GeoLog-26x9586.zip
    │   └── GeoLog-27xab32.zip
    ├── 2025-02-Weekly
    └── 2024-Archive
Backup Size Management
Monitor backup sizes: Backups grow with your library. A 500-photo library might create a 500 MB+ backup file.
If backups become too large:
- Export photos to your Photos library and delete from GeoLog (keeps locations)
- Delete old test locations you no longer need
- Archive old backups and create fresh ones after cleanup
- Consider splitting your library into multiple GeoLog installations (not ideal, but possible)
GeoLog’s Backup & Restore system ensures your location photography library is protected and portable. By creating regular backups and storing them securely, you can switch devices, recover from data loss, or migrate to new versions of the app with confidence. Whether you’re using the automatic iCloud Backup or creating manual ZIP backups, your photography locations and notes are safe and accessible whenever you need them.