
Manual Table Of Contents
- Design Philosophy
- Quick Start
- Location Details
- Settings
- Components
- Additional Information
- Advanced
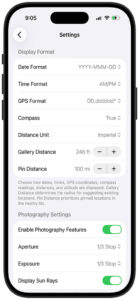
GeoLog provides a comprehensive Settings screen where you can customize how the app displays information and configure photography-related features. Access Settings by tapping Menu → Settings or by tapping the Settings button in the top navigation bar.
Display Format
The Display Format section controls how dates, times, coordinates, and distances appear throughout the app.
Date Format
Choose how dates are displayed in location metadata and throughout the app.
Available formats:
- YYYY-MMM-DD – Year, abbreviated month, day (e.g., “2025-Jan-28”)
- MM/DD/YYYY – Month/day/year (e.g., “01/28/2025”)
- DD/MM/YYYY – Day/month/year (e.g., “28/01/2025”)
Where it appears:
- Location metadata (“Captured: 2025-Jan-28…”)
- Photo timestamps
- Ephemeris date displays
Time Format
Choose between 12-hour and 24-hour time display.
Available formats:
- AM/PM – 12-hour format with AM/PM indicator (e.g., “7:02am”, “4:53pm”)
- 24 Hour – 24-hour military time format (e.g., “07:02”, “16:53”)
Where it appears:
- Sunrise and sunset times on location cards
- Sun Rays timing displays
- Location metadata timestamps
- Ephemeris hourly data
GPS Format
Choose how GPS coordinates are formatted when displayed or copied.
Available formats:
- DD.dddddd° – Decimal degrees (e.g., “43.165475°N, 70.592758°W”)
- DD° MM.mmm’ – Degrees and decimal minutes (e.g., “43° 09.929’N, 70° 35.566’W”)
- DD° MM’ SS.s” – Degrees, minutes, and seconds (e.g., “43° 09′ 55.7″N, 70° 35′ 33.9″W”)
Where it appears:
- Location metadata coordinate display
- GPS button copy format
- Shared location information
Note: Decimal degrees (DD.dddddd°) is the most common format for modern GPS applications and is compatible with most mapping software, TPE, and PhotoPills.
Compass
Choose whether compass headings display cardinal directions alongside numeric degrees.
Available options:
- True – Shows both degrees and direction (e.g., “91.2° E”)
- False – Shows only degrees (e.g., “91.2°”)
Where it appears:
- Location metadata heading display
- Camera heading information
Recommendation: Keep this set to True for easier interpretation of heading data. “91.2° E” is more immediately understandable than just “91.2°”.
Distance Unit
Choose whether distances are displayed in imperial (miles/feet) or metric (kilometers/meters) units.
Available options:
- Imperial – Miles and feet (e.g., “10.1 mi”, “246 ft”)
- Metric – Kilometers and meters (e.g., “16.3 km”, “75 m”)
Where it appears:
- Location distance from current position
- Gallery Distance and Pin Distance settings
- Altitude measurements
- Distance indicators in search results and location lists
Gallery Distance
Set the radius within which GeoLog suggests adding new photos to existing locations or offers to move photos between locations.
Default: 246 ft (75 m)
Adjustment:
- Tap the minus (−) button to decrease distance
- Tap the plus (+) button to increase distance
- Adjusts in increments based on selected Distance Unit
What it does: When you exit the camera after taking photos, GeoLog searches for existing locations within this radius. If found, you’re offered the option to add your new photos to an existing location instead of creating a new one.
This setting also determines which locations appear as destinations in the “Move Photos to Another Location” feature.
Choosing the right value:
- Smaller radius (100-200 ft / 30-60 m): Creates more separate locations for different viewpoints; good for urban photography or when precise position matters
- Medium radius (200-300 ft / 60-90 m): Good general-purpose setting for most photography
- Larger radius (400-800 ft / 120-240 m): Consolidates more photos into single locations; good for landscape photography where you’re working a general area
Context help: The gray text below explains: “Gallery Distance determines the radius for suggesting existing locations. Pin Distance prioritizes pinned locations in the nearby list.”
Pin Distance
Set the radius within which pinned locations are prioritized at the top of the Nearby Locations list.
Default: 100 mi (161 km)
Adjustment:
- Tap the minus (−) button to decrease distance
- Tap the plus (+) button to increase distance
- Adjusts in increments based on selected Distance Unit
What it does: When viewing the Home screen (Nearby Locations), pinned locations within this radius appear at the top of the list, sorted by distance. This ensures your favorite or priority locations are always visible when you’re in the area.
Choosing the right value:
- Smaller radius (25-50 mi / 40-80 km): Only shows pinned locations when you’re relatively close; good if you travel frequently between distant areas
- Medium radius (100-200 mi / 160-320 km): Good general-purpose setting; shows pinned locations within a day’s drive
- Larger radius (500+ mi / 800+ km): Shows all pinned locations regardless of distance; good if you primarily work in one region
Example scenario: You pin 5 favorite coastal locations in Maine. With Pin Distance set to 100 miles, those locations appear at the top of your Nearby list when you’re anywhere in New England. When you travel to California, they drop off the nearby list (since they’re outside the radius) and California locations take priority.
Photography Settings
The Photography Settings section controls camera-related features and visual aids for photography planning.
Enable Photography Features
Master toggle for all photography-related calculators and tools.
When enabled (green):
- Aperture and Exposure settings become available
- Photography calculators are accessible
- Camera features use these settings
When disabled (gray):
- Photography calculator features are hidden
- Aperture and Exposure settings are grayed out
- Simplifies the interface if you don’t use these features
Why you might disable this: If you primarily use GeoLog for location tracking and don’t need the depth of field calculators, exposure compensation tools, or other photography-specific features, disabling this setting streamlines the interface.
Aperture
Set your default aperture (f-stop) for photography calculators.
Default: 1/3 Stop
Available options:
- 1/3 Stop – Fine adjustments (f/1.4, f/1.6, f/1.8, f/2.0, f/2.2, f/2.5…)
- 1/2 Stop – Medium adjustments (f/1.4, f/1.7, f/2.0, f/2.4, f/2.8…)
- Full Stop – Traditional full-stop increments (f/1.4, f/2, f/2.8, f/4, f/5.6, f/8…)
What it affects: This setting determines which aperture values appear in the depth of field calculator and other photography tools. It doesn’t limit your camera—it just controls which f-stops are shown as options in GeoLog’s calculators.
Recommendation: Match this to how your camera’s aperture control works. Most modern cameras use 1/3 stop increments by default, but some film cameras or manual lenses use full stops only.
Exposure
Set your default exposure increment for exposure compensation and timer calculators.
Default: 1/3 Stop
Available options:
- 1/3 Stop – Fine adjustments for precise exposure control
- 1/2 Stop – Medium adjustments, common on some older cameras
- Full Stop – Whole-stop adjustments
What it affects: This setting controls the increment values in the exposure compensation calculator, which includes neutral density filter calculations and film reciprocity adjustments.
Recommendation: Match this to your camera’s exposure compensation dial. Most digital cameras use 1/3 stop increments, providing precise control over exposure adjustments.
Display Sun Rays
Toggle the Sun Rays feature on location cards.
When enabled (green):
- Small directional arrows appear next to sunrise and sunset times on location cards
- Arrows show sun direction relative to your camera heading
- Helps you quickly identify front-lit vs. backlit conditions
- See the “Sun Rays” section of this manual for detailed explanation
When disabled (gray):
- Only sunrise and sunset times appear (no directional arrows)
- Cleaner, simpler display on location cards
- Useful if you prefer to check detailed sun position in the Ephemeris tab
First-time enable: When you first enable this feature, GeoLog displays a detailed explanation dialog describing how the arrows work and what they represent.
How Settings Sync
iCloud Sync: All settings sync across your devices via iCloud (if iCloud is enabled for GeoLog). When you change a setting on your iPhone, it automatically updates on your iPad and vice versa.
Setting preservation: Settings are preserved even if you:
- Delete and reinstall the app (if restoring from iCloud backup)
- Update to a new version of GeoLog
- Sign in on a new device with the same iCloud account
Independent settings: Each setting works independently. Changing one doesn’t affect others. For example, switching from Imperial to Metric units doesn’t change your Date Format or GPS Format preferences.
Tips for Optimal Settings
Match your workflow: Configure Display Format settings to match how you typically work. If you use The Photographer’s Ephemeris frequently, keep GPS Format set to decimal degrees (DD.dddddd°) for easy copy-paste compatibility.
Regional considerations: If you travel internationally, consider:
- 24-hour time format (universal standard)
- DD/MM/YYYY date format (international standard)
- Metric distance units (used in most countries)
Or keep your home preferences and mentally convert when traveling.
Gallery Distance affects workflow: If you find yourself constantly getting suggestions to add photos to existing locations when you want separate locations, decrease Gallery Distance. If you’re creating too many duplicate locations for the same spot, increase it.
Pin Distance strategy: Set Pin Distance based on your photography range. Local photographers might use 50 miles, while those who travel regionally might use 200+ miles.
Photography features: If you’re just starting with GeoLog and feel overwhelmed, disable Photography Features initially. You can always enable them later as you become more familiar with the app and want to use the calculators.
Sun Rays visualization: Try enabling Display Sun Rays for a week to see if you find it helpful. Some photographers love the quick visual reference, while others prefer the cleaner look without arrows and rely on the Ephemeris tab for detailed planning.
The Settings screen gives you complete control over how GeoLog displays information and which features are active. Take a few minutes to configure these settings to match your photography workflow, and the app will feel more natural and efficient to use.