
Manual Table Of Contents
- Design Philosophy
- Quick Start
- Location Details
- Settings
- Components
- Additional Information
- Advanced
The Location Details screen is the central hub for each saved location in GeoLog. This is where you view photos, review address information, access planning tools, and manage all aspects of a location. The interface adapts to your device—iPad provides a spacious side-by-side layout for efficient browsing, while iPhone offers a focused, full-screen experience optimized for one-handed use.
Accessing Location Details
From any location list:
- Tap any location card to open its details
- Works from Home (Nearby Locations), Search results, Map pins, or any filtered view
From iPad sidebar:
- When viewing the Home screen or Search results, tap a location in the left sidebar
- The location details appear in the right panel, allowing you to browse multiple locations without losing your place in the list
Interface Overview
The Location Details screen is organized into several sections:
Top Navigation Tabs
Four tabs provide access to different aspects of the location:
Location Tab (default):
- Main photo and gallery thumbnails
- Location name and address
- Notes section
- Quick action buttons
- Metadata (coordinates, heading, altitude, distance)
- Delete location button
Gallery Tab:
- Full gallery of all photos at this location
- Grid view for easy browsing
- Tap any photo to view full-screen
- Change main photo by tapping the star icon
- Delete individual photos
Ephemeris Tab:
- Detailed sun and moon position data
- Date picker for planning future shoots
- Hour-by-hour position information
- Sunrise, sunset, and twilight times
- Optimal shooting windows
Weather Tab:
- Current weather conditions at the location
- Multi-day forecast
- Temperature, precipitation, wind
- Cloud cover and visibility
- Helps plan return visits
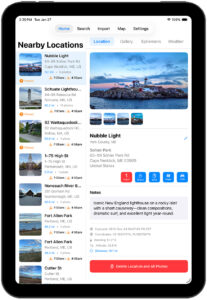
iPad Layout
The iPad uses a split-view layout that maximizes screen space:
Left Panel: Location List
- Scrollable list of nearby locations or search results
- Tap any location to load it in the right panel
- Currently selected location is highlighted
- Continue browsing without leaving Location Details
Right Panel: Location Details
- Full-width main photo
- Four gallery thumbnails below
- Location information and controls
- Tabs for Gallery, Ephemeris, Weather
- Optimized for landscape orientation
Benefits of iPad Layout:
- Compare multiple locations quickly
- Review location details while keeping the list visible
- Efficient planning workflow—check one location’s ephemeris, tap the next location, repeat
- Gallery thumbnails are larger for better visibility
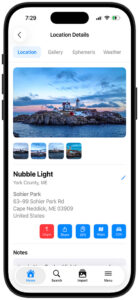
iPhone Layout
The iPhone provides a focused, full-screen experience:
Navigation:
- Back button (< ) in upper-left returns to previous list
- Location name in navigation bar
- Tabs directly below navigation
Content:
- Full-width main photo
- Four gallery thumbnails in a row
- Location information fills the screen
- Scroll vertically for notes and metadata
- Quick action buttons prominently displayed
Benefits of iPhone Layout:
- Distraction-free view of each location
- Large photos for detailed review
- Easy one-handed navigation
- Optimized for portrait orientation
Main Photo and Gallery Thumbnails
Main Photo
The main photo represents the location throughout GeoLog:
- Appears on location cards in lists
- Used for map pins
- Shown in search results
- Featured at the top of Location Details
Purpose of main photo: Choose the image that best shows:
- What makes this location worth returning to
- The primary composition or subject
- Ideal lighting conditions you captured
- The reason you saved this location
Gallery Thumbnails
Below the main photo, you’ll see up to four gallery photo thumbnails (if you have multiple photos at this location).
Viewing Gallery Photos:
- Tap any thumbnail to view it full-screen
- Swipe left/right to browse all photos
- Pinch to zoom for detail examination
- Perfect for reviewing context photos, signs, or alternate compositions
Changing the Main Photo:
- Go to the Gallery tab
- Tap the star icon on any photo to make it the main photo
- Return to the Location tab to see the change
On iPad: Gallery thumbnails are larger, making it easier to preview photos without opening them full-screen.
On iPhone: Gallery thumbnails are compact but tappable, maintaining a clean interface while providing quick access.
Location Name and Address
Location Name
The location name appears as a large, bold heading below the photos. This name is generated by reverse geocoding when you create the location, but you can customize it.
Editing the location name:
- Tap the blue pencil icon next to the location name
- Enter your preferred name
- Tap outside the field or press Done to save
Why customize:
- Make names more memorable (“Lighthouse Sunrise Spot” vs “Sohier Park”)
- Add context (“Nubble – Low Tide Access” vs just “Nubble Light”)
- Organize by project (“Client Wedding – Ceremony Site”)
- Include equipment notes (“Nubble – 70-200mm recommended”)
Subtitle and Address
Below the location name:
- Subtitle: County and state (e.g., “York County, ME”)
- Full address: Complete street address including:
- Park or landmark name
- Street address
- City, state, ZIP code
- Country
Understanding the address: Remember that the address reflects your camera position, not necessarily the subject you photographed. This is the spot you need to return to for the same composition.
Example:
- Location name: “Nubble Light”
- Park name: “Sohier Park”
- Address: “63–99 Sohier Park Rd, Cape Neddick, ME 03909”
- This tells you exactly where to park and stand for your composition
Quick Action Buttons

Below the address, a row of blue buttons provides fast access to common actions:
Unpin / Pin Button (Red or Blue)
Unpin (Red):
- Appears when the location is currently pinned
- Tap to remove from pinned locations
- Icon: pin with slash
Pin (Blue):
- Appears when the location is not pinned
- Tap to add to pinned locations
- Icon: pin
- Pinned locations appear at the top of Nearby Locations list
Use pinning for:
- Marking favorite locations for quick access
- Flagging locations to revisit soon
- Organizing locations you’re actively working
Share Button
Tap to share to create a Location Detail Report (in PDF format) for printing, or sharing with others via:
- Messages, Mail, AirDrop
- Social media apps
- Any sharing method iOS supports
What gets shared:
- Location name and address
- GPS coordinates
- Main photo
- Notes (if any)
- Gallery Photos, and their locaions
Use cases: (Primarily for printing)
- Share locations with photography friends
- Send shooting locations to clients
- Create location reference for workshop participants
- Build location guides for group shoots
GPS Button
Tap to copy GPS coordinates to clipboard.
Format: Coordinates are copied as: 43.165475°N, 70.592758°W
Use cases:
- Paste into The Photographer’s Ephemeris (TPE)
- Enter into PhotoPills for detailed planning
- Use in Google Earth for 3D terrain visualization
- Share exact coordinates when address isn’t sufficient
- Import into other mapping or GPS applications
Use with “Anchored Location” Sorting:
GeoLog includes a powerful search feature that sorts all locations by distance from a fixed anchor point rather than your current position. To use it: tap the GPS button to copy a location’s coordinates, navigate to the Search screen, tap the “Anchor” button under “Sort Locations By,” then tap the GPS button there. The copied coordinates are automatically pasted, and your location list changes to “Nearby Anchors”—showing all locations sorted by distance from that fixed point. This is invaluable for planning multi-location shoots around a central base camp, hotel, or favorite shooting area, letting you see which locations are clustered together regardless of where you currently are.
On iPad: This is especially useful since you can copy from GeoLog and paste directly into TPE or PhotoPills running side-by-side in Split View.
Maps Button
Tap to open the location in Apple Maps.
What happens:
- Apple Maps launches (or switches to it if already open)
- Location is centered and marked
- You can immediately get directions, view satellite imagery, or explore the area
Use cases:
- Check traffic before heading to location
- Review terrain and parking options
- See nearby amenities (restaurants, restrooms)
- Get walking or driving directions
- Explore alternate viewpoints nearby
Navigation Button (22m / Distance)
Tap to start turn-by-turn navigation to the location.
What happens:
- Apple Maps opens with navigation started
- Distance shown on button indicates how far away you are (updates based on your current position)
- Choose driving, walking, or transit directions
Distance indicators:
- Updates in real-time as you move
- Shown in miles or kilometers based on device settings
- Helps prioritize which locations to visit when you have limited time
Use cases:
- Navigate to location for a shoot
- Find your way back to a location you visited before
- Estimate travel time when planning multiple location visits
- Determine if you can reach the location before sunset
Notes Section
The Notes section provides a text area for capturing important information about the location.
What to include in notes:
- Lighting observations: “Best light 30 minutes before sunset”
- Equipment recommendations: “Bring 70-200mm, 24mm too wide”
- Access information: “Parking lot closes at 8pm, arrive early”
- Composition ideas: “Try lower angle from rocks on left”
- Seasonal considerations: “Cherry blossoms peak in April”
- Hazards or challenges: “Slippery rocks when wet, watch footing”
- Context from signs: “Built 1879, restored 2015” (if you didn’t photograph the sign)
- Return planning: “Need to come back with graduated ND filter”
- Weather preferences: “Dramatic with stormy skies”
Editing notes:
- Tap the notes area
- Keyboard appears
- Type or edit text
- Tap outside the field to save automatically
On iPad: The larger screen makes notes easier to read and write, especially useful for longer entries.
On iPhone: Notes are fully functional but optimized for briefer entries; you can still write detailed notes if needed.
Tips:
- Write notes immediately after visiting while details are fresh
- Include specific measurements if relevant (e.g., “10 feet from trail marker”)
- Reference nearby landmarks for relocating specific spots
- Note tide levels if photographing coastal locations
- Record filter combinations that worked well
Metadata Section
Below the notes, GeoLog displays detailed metadata captured with your photos:
Captured Date and Time
Format: “Captured: 2013-Dec-24 04:07:54 PM EST”
Shows:
- Date in YYYY-MMM-DD format
- Time including AM/PM or 24-hour based on settings
- Time zone (important when traveling)
Why it matters:
- Verify you captured the location during optimal lighting
- Compare different visits to the same location by date
- Understand seasonal timing for return trips
- Check time of day for lighting reference
GPS Coordinates
Format: “Coordinates: 43.165475°N, 70.592758°W”
Shows:
- Latitude in decimal degrees
- Longitude in decimal degrees
- Cardinal directions (N/S for latitude, E/W for longitude)
Why it matters:
- Exact camera position for precise navigation
- Can be manually entered into GPS devices
- Useful for technical planning in astronomy apps
- Required for some third-party ephemeris tools
Precision: GeoLog stores coordinates to six decimal places, which represents accuracy within a few feet—precise enough to return to the exact shooting position.
Heading
Format: “Heading: 91.2° E”
Shows:
- Compass direction in degrees (0-360°)
- Cardinal direction abbreviation (N, NE, E, SE, S, SW, W, NW)
Why it matters:
- Shows exactly which direction your camera was pointing
- Used to calculate Sun Rays directional arrows
- Helps recreate the same composition on return visits
- Essential for understanding light direction in ephemeris planning
Understanding heading values:
- 0° / 360° = North
- 90° = East
- 180° = South
- 270° = West
- Example: 91.2° E means you were facing nearly due east, slightly south of true east
Altitude
Format: “Altitude: 32.8 ft”
Shows:
- Elevation above sea level
- Displayed in feet or meters based on device settings
Why it matters:
- Important for mountain and landscape photography
- Affects atmospheric conditions and haze
- Helps estimate sunrise/sunset visibility over terrain
- Useful for aviation photography (knowing ground elevation)
- Relevant for astrophotography planning
Note: Altitude is measured by the iPhone’s GPS and barometric sensors, which are generally accurate within 10-30 feet depending on conditions.
Distance
Format: “Distance: 10.1 mi”
Shows:
- Straight-line distance from your current position to the location
- Updates dynamically as you move
- Displayed in miles or kilometers based on device settings
Why it matters:
- Quickly assess which locations are nearby
- Plan efficient routes when visiting multiple locations
- Determine if a location is within range for today’s shoot
- Estimate travel time (though actual driving distance may differ)
On iPad: Distance is particularly useful when reviewing multiple locations in the sidebar—you can see at a glance which ones are closest.
On iPhone: Distance helps you prioritize location visits when browsing search results or nearby locations.
Delete Location Button
At the bottom of the Location Details screen, a prominent red button allows you to delete the location.
Button text: “Delete Location and All Photos”
What happens when you tap:
- Confirmation dialog appears
- You must confirm the deletion
- The location and all associated photos are permanently deleted
- This action cannot be undone
What gets deleted:
- The location entry itself
- Main photo
- All gallery photos
- All notes
- All metadata
- The location is removed from all lists, maps, and searches
When to delete locations:
- Location no longer exists (demolished building, changed landscape)
- Photos are poor quality and you plan to reshoot
- Duplicate location created by mistake
- No longer relevant to your photography work
- Cleaning up test or experimental locations
Caution: This is a destructive action. If you’re unsure, consider:
- Unpinning the location instead
- Adding a note like “TO DELETE” or “RESHOOT NEEDED”
- Exporting photos to Photos library first (if taken with GeoLog Camera)
- Reviewing the location one more time before deleting
Cannot be undone: GeoLog does not have a trash or recycle bin. Once deleted, the location and photos are permanently removed from GeoLog. If the photos were taken with the GeoLog Camera and not exported to your Photos library, they will be completely gone.
Platform-Specific Features
iPad Advantages
Split-View Workflow: The iPad’s side-by-side layout is ideal for planning workflows:
- Review location details while keeping the list visible
- Quickly compare multiple locations
- Check ephemeris for one location, immediately check another
- Efficient for preparing multi-location shoots
Larger Photos:
- Main photo is larger and more detailed
- Gallery thumbnails are bigger, reducing need to tap to full-screen
- Easier to evaluate composition and lighting from the details view
Multitasking:
- Use Split View with other apps (TPE, PhotoPills, Notes)
- Copy GPS coordinates from GeoLog, paste into TPE side-by-side
- Reference location details while planning in calendar apps
- View location while browsing weather apps
Better for Planning Sessions:
- Comfortable for longer review sessions
- Spacious notes section easier to read and write
- More efficient for organizing multiple locations
iPhone Advantages
Field Use: The iPhone’s portable form factor makes it ideal for actual shooting:
- Always in your pocket when you discover locations
- Quick access to location details on-site
- Easy one-handed operation while holding camera gear
- CarPlay integration for hands-free navigation
Focused Experience:
- Full-screen location details without distractions
- Large, tappable buttons optimized for thumbs
- Clean interface perfect for quick reference
- Efficient vertical scrolling
Real-Time Updates:
- Distance updates as you walk or drive
- Immediate access to navigation
- Current location awareness for nearby searches
- Quick sharing from the field
Tips for Effective Use
Customize location names: Don’t settle for generic reverse-geocoded names. Add your own context to make locations instantly recognizable and searchable.
Write notes immediately: Capture details while still at the location or immediately after. Memory fades quickly, and those notes become invaluable when planning return trips months later.
Use all four tabs: Don’t just stick to the Location tab. Gallery helps you review all photos, Ephemeris helps you plan optimal timing, and Weather helps you choose the right day.
Review metadata: The heading especially is valuable—it tells you exactly where you were facing, which affects Sun Rays and ephemeris planning.
Pin strategically: Don’t pin everything. Reserve pinning for locations you actively want to revisit soon, making the pinned list a true “priority” collection.
Share generously: If you find an amazing location, share it with photography friends. Use the Share button to send complete location details instantly.
Combine with external tools: Use the GPS button to copy coordinates into specialized apps like TPE for detailed sun path visualization or PhotoPills for augmented reality planning.
Check distance regularly: When planning a shoot day, check distance for multiple locations to map out an efficient route that maximizes golden hour opportunities.
Export photos before deleting: If you took photos with the GeoLog Camera, export any keepers to your Photos library before deleting locations.
The Location Details screen is where all your location information comes together. Whether you’re planning a future shoot on your iPad or checking details in the field on your iPhone, this screen provides everything you need to make informed decisions about when and how to photograph each location.