
Version 1.0 – January 2026
What is CameraTimeSync?
CameraTimeSync solves the multi-camera time sync problem. When multiple photographers shoot the same event with different cameras, each camera’s clock is set to a different time. This creates chaos when trying to sequence photos chronologically.
CameraTimeSync provides a single, GPS-synchronized time reference that all photographers photograph at the start of an event. Later in Lightroom, you can automatically align all capture times—no manual clock adjustment needed.
The Problem:
- Camera A is 3 minutes fast
- Camera B is 2 minutes slow
- Camera C is in wrong timezone
- Photos are hopelessly out of sequence
The Solution:
- All photographers photograph CameraTimeSync screen
- Each camera captures its timestamp alongside GPS time
- Lightroom calculates each camera’s offset
- All photos sync to correct chronological order
Who Needs This?
- Event photographers – Weddings, conferences, sports with multiple shooters
- Photo editors – Managing submissions from multiple photographers
- Sports photographers – Coordinating timing across shooters
- News teams – Ensuring accurate chronological sequencing
- Workshop leaders – Helping students sync their work
Quick Start
Before the Event
- Gather all photographers before shooting begins
- Launch CameraTimeSync on iPhone/iPad
- Wait for GPS lock (coordinates stop changing, 10-30 seconds)
- Max screen brightness (swipe down, drag brightness slider up)
- Each photographer photographs the screen with their event camera
- Verify – Each photographer checks their reference photo is clear
- Begin shooting – Everyone starts the event
After the Event
- Import all photos to Lightroom (including reference photos)
- For each photographer:
- Find their CameraTimeSync reference photo
- Note the time displayed on screen in the photo
- Select all that photographer’s photos
- Metadata → Edit Capture Time
- “Adjust to a specified date and time”
- Enter the time from the CameraTimeSync display
- Apply
- Done – All photos now in correct chronological order
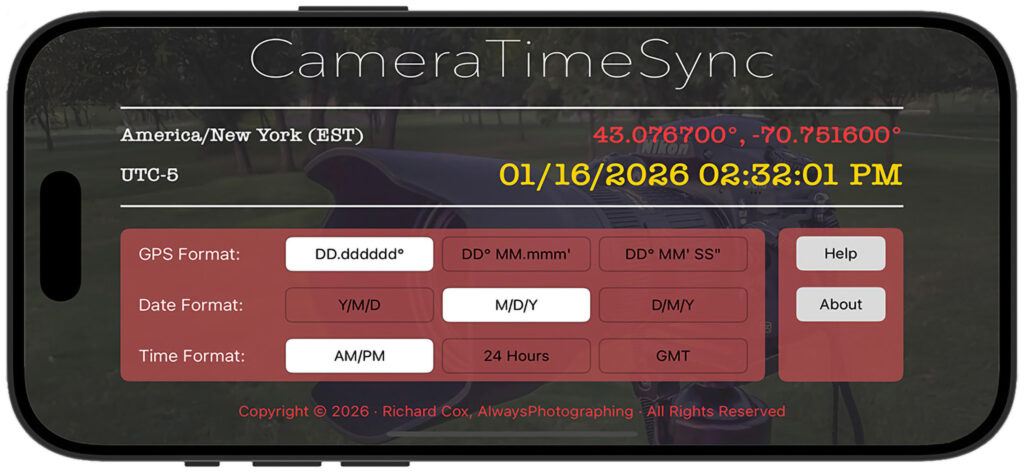
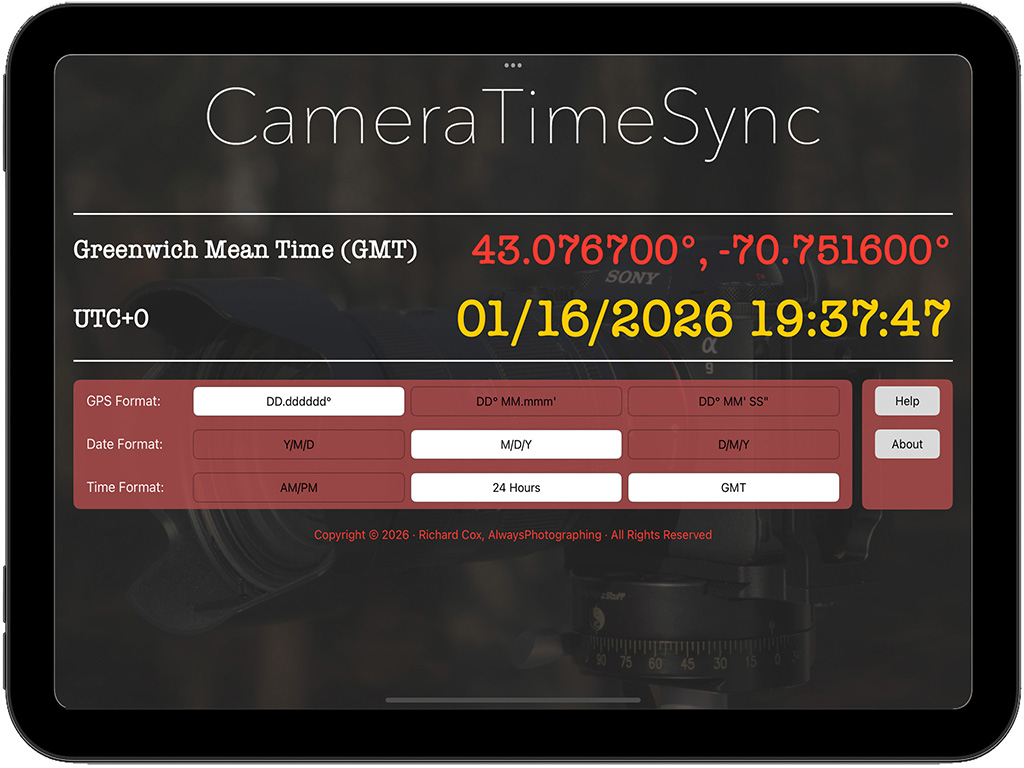
Understanding the Display
Timezone Information (Left)
Top line: Full timezone name
Example: America/New_York (EST)
Second line: UTC offset
Example: UTC-05:00
GPS Coordinates (Right, Top)
Shows your current location in selected format—useful for verifying all photographers are at the same venue.
Date and Time (Right, Bottom)
Large, bold display showing current GPS-synchronized time:
- Example:
01/11/2026 14:35:47 - Updates every second
- This is what photographers photograph and reference
Format Settings (Bottom)
Three selectors control display format:
- GPS Format: Decimal degrees, Degrees-Minutes, or DMS
- Date Format: Y/M/D, M/D/Y, or D/M/Y
- Time Format: 12-hour (AM/PM) or 24-hour
Detailed Workflow
Pre-Event Setup (5 minutes)
1. Location and Setup
- Gather all photographers in one spot
- Find location with good GPS signal (outdoors or near windows)
- Someone holds iPhone/iPad running CameraTimeSync
2. App Configuration
- Open CameraTimeSync
- Wait for GPS lock (coordinates appear and stabilize)
- Choose display format:
- US photographers: M/D/Y and AM/PM
- International: Y/M/D and 24 Hours
- Swipe down from top-right, max brightness
3. Reference Photo Capture
Each photographer in turn:
- Positions their camera facing the display
- Frames the entire screen
- Focuses on the center date/time area
- Takes a clear, sharp photo
- Reviews to ensure time is readable
- Gives thumbs up when ready
Important timing: All photographers should capture their reference photos within 1-2 minutes of each other. The display updates every second, so each person’s photo will show a slightly different time—this is normal and expected.
Don’t adjust camera clocks! Leave every camera at whatever time it shows. CameraTimeSync will fix everything in post.
During the Event
- Photographers shoot normally
- No need to touch CameraTimeSync again
- Camera clocks don’t need to match
- Focus on getting the shots
Lightroom Synchronization
Step-by-Step for Each Camera
1. Find the reference photo
- Look for the CameraTimeSync screen capture
- Make sure you can read the displayed time
2. Note two times:
- Camera’s time: What Lightroom shows as capture time
- Actual time: What’s displayed on the CameraTimeSync screen in the photo
3. Select all photos from this camera
- Use filters or sorting to group by camera
- Include every photo from start to end of event
4. Apply time correction
- Metadata → Edit Capture Time
- Choose “Adjust to a specified date and time”
- Enter the actual time from the CameraTimeSync display
- Click OK/Apply
5. Repeat for each camera
- Each photographer/camera needs its own correction
- Use their specific reference photo
6. Verify
- Sort all photos by capture time
- Photos should now flow chronologically
- Multiple angles of same moment should cluster together
Example Scenario
Wedding with 3 photographers:
Photographer A (Canon 5D):
- Reference photo shows CameraTimeSync time:
14:32:14 - Lightroom shows camera captured at:
14:35:47 - Camera is 3 min 33 sec fast
- Select all Canon photos → sync to
14:32:14
Photographer B (Nikon Z9):
- Reference photo shows CameraTimeSync time:
14:32:47 - Lightroom shows camera captured at:
14:30:51 - Camera is 1 min 56 sec slow
- Select all Nikon photos → sync to
14:32:47
Photographer C (Sony A7):
- Reference photo shows CameraTimeSync time:
14:33:21 - Lightroom shows camera captured at:
17:33:21 - Camera is 3 hours fast (wrong timezone!)
- Select all Sony photos → sync to
14:33:21
Result: All 1,029 photos now in perfect chronological order.
Tips
Before Event:
- Test the workflow with your team beforehand
- Make sure everyone understands the process
- Choose one person to hold the iPhone/iPad steady
- Pick a well-lit location with good GPS reception
During Reference Capture:
- Max screen brightness is critical
- Shield screen from direct sun glare
- Each photographer should verify their photo is sharp
- Take a second reference photo if first is unclear
- Capture reference photos close together (within 1-2 minutes)
In Lightroom:
- Do one camera at a time to avoid confusion
- Double-check you’re reading the correct time from the display
- Make sure you selected ALL photos from that camera
- Test with a few photos first to verify offset is correct
- Create a collection for reference photos so they’re easy to find
For Large Events:
- Consider taking reference photos at start and end
- If event spans multiple hours, second reference helps verify drift
- Keep the CameraTimeSync device in a safe place
- Assign someone to manage the reference capture process
Troubleshooting
GPS shows “N/A”:
- Move outdoors or near windows
- Wait 60 seconds for satellite lock
- Check Location Services enabled (iOS Settings → CameraTimeSync)
Time seems wrong:
- GPS time is UTC-based, timezone is automatic
- If timezone is wrong, wait longer for GPS to lock fully
- Display shows local time, not UTC
Reference photo is blurry:
- Increase camera shutter speed
- Ensure focus is on screen
- Increase screen brightness
- Hold device steady
Photos still out of sync after applying:
- Verify you read the correct time from display
- Check you selected all photos from that camera
- Confirm time was entered correctly in Lightroom
- Try undoing and reapplying with correct values
Screen too dim in bright sun:
- Maximum brightness already applied
- Shade screen with your body or hand while photographing
- Adjust camera exposure to capture bright screen
- Consider using tablet for larger, easier-to-read display
Multiple photographers can’t see screen:
- Use iPad for larger display
- Have photographers take turns one at a time
- Consider projecting display to larger screen (if available)
- Each photographer can photograph at their own pace
Advanced Tips
For Precision Work:
- All photographers capture reference within 30 seconds of each other
- Use countdown (“Everyone shoot on 3… 2… 1… now!”)
- Consider using multiple devices if team is large (>5 photographers)
For International Events:
- GPS automatically handles timezone changes
- Use Y/M/D and 24-hour format (less confusion)
- Display shows timezone and UTC offset for reference
For Video/Hybrid Workflows:
- Still photographers sync using CameraTimeSync
- Video timecode is separate (consider dedicated timecode tools)
- But CameraTimeSync can provide rough video sync reference
Why GPS Time?
CameraTimeSync uses GPS satellites for time because:
- Atomic clock accuracy – Synchronized to microseconds
- Universal – Works worldwide without cellular/Wi-Fi
- Independent – Not affected by device timezone settings
- Reliable – Doesn’t drift like camera clocks
Your iPhone/iPad receives time signals from GPS satellites, giving you the most accurate time reference possible for photography.
Privacy
CameraTimeSync respects your privacy:
- No data collection or tracking
- No analytics
- No cloud services or accounts
- Location used only for time synchronization
- All processing happens locally on your device
Device Compatibility
Works on:
- iPhone with GPS (all models)
- iPad with GPS (cellular models only)
- iOS 17.0 or later
Does not work on:
- Wi-Fi-only iPads (no GPS hardware)
Software:
- Adobe Lightroom Classic (recommended)
- Adobe Lightroom CC
- Any software with capture time editing
Quick Reference
Pre-Event Checklist
- [ ] Gather all photographers
- [ ] Launch CameraTimeSync
- [ ] Wait for GPS lock
- [ ] Choose display format
- [ ] Max screen brightness
- [ ] Each photographer captures reference photo
- [ ] Verify all reference photos are clear
Lightroom Sync (Per Camera)
- Find reference photo
- Note camera’s capture time (Lightroom)
- Note actual time (displayed in photo)
- Select ALL photos from this camera
- Metadata → Edit Capture Time
- Enter actual time from CameraTimeSync
- Apply correction
Support
Developer: Richard Cox
Email: support@alwaysphotographing.com
Website: AlwaysPhotographing.com
For issues or suggestions, please include:
- Device model
- iOS version
- Description of issue
- Screenshot if applicable
Thank you for using CameraTimeSync! 📸
© 2026 Richard Cox. All rights reserved.